Are you constantly receiving the red light on your motherboard but don’t know what it means? Red light can indeed be a cause of concern, but don’t worry, I will tell you all about it.
A red light on the motherboard means that the motherboard not working properly. It is due to faulty hardware or the CPU, RAM, and GPU not being connected properly. Dead CMOS battery and boot failure can also result in the motherboard giving a red led light.
Although there can be multiple reasons why a motherboard gives a red light, don’t worry because I will cover all of them. This article will have in-depth information on the following.
- What does the red light on the motherboard mean
- The different types of red lights on a motherboard
- How to diagnose and fix red light issues
At the end of the article, you will be able to figure out what the red light on your motherboard means. Not only that, but you will also be able to fix it. So, without further ado, let’s begin.
Why Does Red Light Come on a Motherboard?
Red light in a motherboard is not common, and you will only experience it if there is something seriously wrong with your motherboard. The red light is accompanied by no display screen as well.
The most probable cause of the motherboard’s red light is faulty PC hardware. Since the motherboard is the computer’s main circuit board, it has all the other components of the PC connected to it.
Any fault in these PC components will trigger the motherboard’s response system and issue an alert in the form of the red light that you see on a motherboard.
Three main components can cause the red light to occur, and those are,
- CPU
- DRAM
- GPU
If the CPU stops working suddenly, the computer won’t be able to start. Therefore, resulting in no display on the monitor screen and a red light on the motherboard.
The RAM is another critical component that has its own part in the computer startup. If this component is faulty, the computer will fail to boot. As a result, the red DRAM light on the motherboard will come on.
The graphics card or the GPU of the PC is the component to which the external monitor is connected. Therefore, this component is responsible for the display signal. If anything wrong occurs with the GPU, the PC won’t show any display, and the motherboard red light will come on.
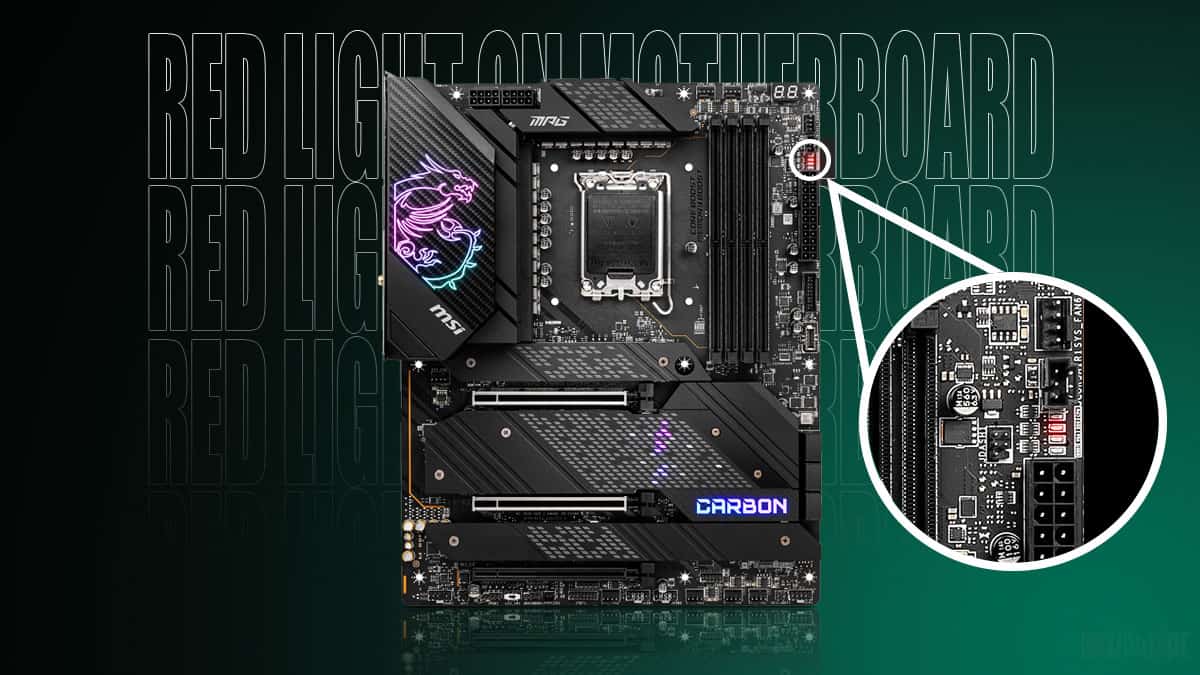
Where Is the Motherboard Red Light Located?
The red lights of the motherboard are typically located at the right edge of the motherboard near the CPU socket.
Though in some motherboards, their position may vary. Some motherboards have them located at the bottom chin near the front panel headers.
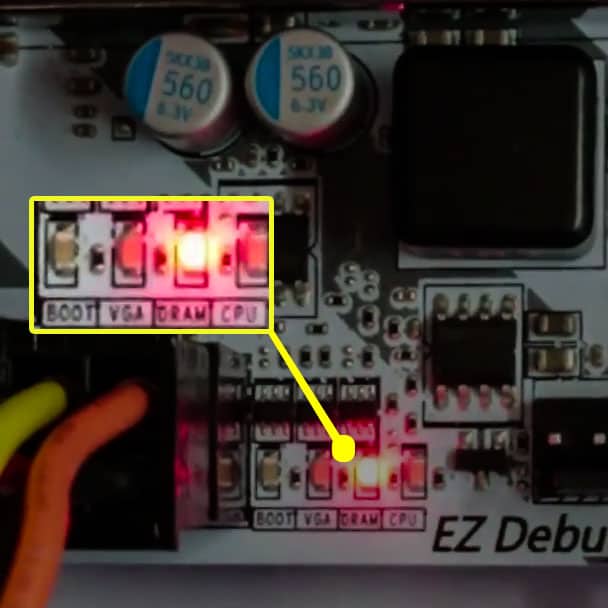
How to Diagnose the Different Types of Red Lights on the Motherboard?
Once you navigate to the motherboard’s red light cluster, you will be greeted with four different led lights. These four led lights correspond to different faults and issues.
The four led options will be labeled as,
- CPU
- DRAM
- VGA
- Boot
Red CPU light on the Motherboard
The CPU red light of the motherboard comes on when there is an issue with the CPU. It is usually a result of a faulty CPU socket, bent pins, or a CPU malfunction.
Red DRAM light on the Motherboard
The DRAM red light of the motherboard comes on when the computer’s RAM has an issue. It is usually caused by a bent RAM pin or a broken RAM slot.
Red VGA light on the Motherboard
VGA refers to the GPU of your computer. therefore, the VGA red light of the motherboard comes on when there is an issue with the GPU. This issue can occur for several reasons, and the most common are faulty GPU chips, broken power cables, or short circuits.
Red Boot light on the Motherboard
Boot refers to the start-up of the computer. Multiple things happen when a PC starts, and if any of them fails, the red Boot light of the motherboard will come on.
The red Boot light will also turn on if something is wrong with the OS or the storage drives, i.e., the SSD or the hard disk in which the Windows is stored.
How to Make the Red Light of a Motherboard Go Away?
You can use certain techniques and methods that can potentially fix the red light on the motherboard. I know you want to get to the methods right away, so the following is a list of them.
1. Reinstall the GPU, RAM, and the CPU
Sometimes, the issue might not be as big as you think. There can be a case of misaligned or loose cables or pins. Therefore, taking out the GPU, RAM, and CPU and installing them back in would fix any such issues.
Depending on which motherboard red light you are getting, i.e., CPU, DRAM, or VGA. Only reinstall that component of the PC.
You can use the following method to reinstall the CPU, GPU, and RAM.
How to Reinstall the GPU
- Remove the side panel of the case by unscrewing the thumbscrews.
- Pull out the cable attached to the GPU.
- Unlatch the clip of the PCIe slot holding the GPU.
- Remove the two thumb screws holding the GPU against the PC case.
- Pull on the GPU to remove it from the PCIe slot, but don’t use excessive force to avoid damage to the PCIe slot
- If the GPU feels stuck, give it a little shake.
- Once the GPU is out, let it rest for a couple of minutes.
- Now, reinstall the GPU.
- Open the clip of the PCIe slot.
- Align the PCB of the GPU to the PCIe slot.
- Give the GPU a little wiggle to guide it into the PCIe slot.
- Upon successfully installing the GPU, the clip of the PCIe slot should snap back into place.
- Fasten the screws holding the GPU to the PC case.
- Plug in the GPU cable.
After successfully following this method, your GPU should successfully be installed on the motherboard. Now, fire up your PC and give it a go. This method will only fix the GPU red light.
How to Reinstall the RAM
- Unlatch the two clips holding the RAM to the motherboard
- Unlatch the two clips on either side of the RAM slot holding the RAM to the motherboard.
- The RAM stick should automatically pop out when the clips are unlatched. Remove the RAM from the RAM slot.
- Repeat this process if you have more than one RAM stick.
- After you have removed the RAM, let it sit on the side for a couple of minutes.
- Now, reinstall the RAM that you have just removed.
- Open the two clips on either side of the RAM slot.
- Align the small indent in the RAM with the cutout in the RAM slot.
- If aligned correctly, the RAM should slide into the RAM slot.
- Apply gentle force on each corner of the RAM until you hear a snap to secure the RAM to the RAM slot.
- The snap is from clips returning to their original position and securing the RAM in its place. It is an indication that you have installed the RAM correctly.
How to Reinstall the CPU
Removing the CPU is the hardest part and requires you to have the heatsink removed from the PC. Therefore, follow the process with great focus.
- Remove the CPU cooler by unscrewing the 4 screws it is held by. Some heatsinks might also require you to remove the screws from the motherboard’s backside as well.
- If your CPU cooler has screws on the backside, open the right-side panel of your PC to get access to the backside of the motherboard. Unfasten the screws holding the heatsink backplate into the motherboard.
- Remove the 3-pin CPU Cooler cable and 8-pin CPU cable by pulling them out of their motherboard connectors
- Push to slide the retention arm out of the CPU socket. This should free the CPU from the socket and lift it up slightly.
- By holding the CPU from the edges, gently pull it up. Don’t shake it side to side nor use any excessive force because that can damage the pins of the CPU or the CPU socket
- Once the CPU is out, let it rest for 2-3 minutes by placing it face down on a clean and even surface.
- After 2-3 minutes, reinstall the CPU into the CPU socket.
- Push the retention arm out of the CPU socket
- Align the corner of the CPU with an arrow to the corner of the CPU socket with an arrow pointing in the same direction.
- Gently place the CPU into the motherboard’s socket. Don’t push the CPU in; let it naturally sit into the socket.
- If you align it correctly, the CPU should slide into the socket with minimal effort.
- Very lightly rock the CPU in its position to see if it is seated correctly. A correctly seated CPU should have little to no movement.
- 13) Now, close the retention arm to secure the CPU to the socket.
- A pea-size drop or the small line of thermal compound down the middle is more than enough on most CPUs. Always remember with a thermal compound, less is more.
- Line up the four mounting pins of the CPU cooler to the holes around the CPU socket.
- Push on each CPU cooler pin until you hear a snap
- Plug in the 8-pin CPU cable and the 3-pin CPU Cooler cable into the motherboard
I know reinstalling the CPU is the hardest and requires many intricate processes, but if you follow it right, it can fix the red CPU led on the motherboard. If you want a more in-depth guide on reinstalling a CPU, you can refer to the CPU section of my article on how to build a gaming PC.
2. Reset the BIOS of the Motherboard
A motherboard’s BIOS can get corrupted quite easily. Due to a corrupt BIOS, your PC will not BOOT into Windows, and eventually, the red motherboard light will turn on as a consequence. Resetting the BIOS will solve this issue.
I already have an in-depth article on resetting the motherboard BIOS, so I won’t be going into much detail here. Long story short, you can reset your BIOS by doing the following.
- Locate the CMOS jumper pins of the motherboard
- There will be two pins with CMOS CLR text around them
- Place a screwdriver between these pins for 10-15 seconds. Make sure your screwdriver makes contact with both of the pins simultaneously.
- After 15 seconds, take off your screwdriver from the pins, which should reset your motherboard.
3. Replace the CMOS Battery
The CMOS battery is the coin-shaped cell battery in the middle of your motherboard. A dead CMOS battery will not allow the computer to start, triggering the motherboard’s Boot red light.
Therefore, replacing the CMOS battery can sometimes fix this red light issue. To replace the CMOS battery, do the following.
- Order yourself a new CMOS battery
- Open the left side panel of the case
- Navigate to the CMOS battery of the motherboard and remove it by pushing the bracket’s pin inwards.
- This should free the battery from the socket
- Place the new battery into the CMOS battery socket. Make sure to keep the dotted side of the CMOS battery on the lower side and the plain side with the + sign on the upside.
- Push the battery into the socket until you hear a snap
- You have now successfully replaced your CMOS battery, and you can reinstall the left side panel of the case.
After replacing the CMOS battery, turn on your motherboard and see if the red Boot light is still there.
4. Clean Dust From Hardware Connectors and Cables
Dust is the Achilles heel of most computers and is the cause for failure with many of them. It is hard to prevent dust buildup, especially in connector pins and cables.
The small grim and dust particles over time can choke the connectors, hence disturbing the flow of current. Therefore, in your periodic PC cleaning, you should also clean the different connectors and cable pins.
Add this to your routine cleaning, and you won’t have any issues in the future. You can use the following method to clean dust from the hardware connectors, cables, and pins.
- Remove the GPU, CPU, and RAM using the method I mentioned in the previous section
- Once you have removed the GPU, CPU, and RAM, set them to the side.
- Take the GPU power cable and the CPU power cable and tuck them away from the motherboard
- Now, take the can of compressed air and spray it in the RAM slot, GPU slot, and the CPU socket of the motherboard
- Spray the connector of the GPU power cable and CPU power cable with compressed air as well.
- Start cleaning the CPU, RAM, and CPU.
- For the GPU, focus the cleaning around the fan, metal sinks, and the power plug of the GPU.
- For the CPU, grab it by the edges and keep the compressed air at least a foot away when cleaning it because the pins of the CPU are quite sensitive.
- After cleaning all three components, reinstall all of them back into the PC.
- Plug all the wires and boot your PC.
5. Start Your PC Without the Graphics Card
Let’s check the GPU for any faults to ensure that the graphics card is not causing the red light on the motherboard. To check the GPU, do the following:
- Open the left side panel of your PC
- Remove the GPU by using the previously mentioned method.
- After the GPU is removed, rotate over to the back of your PC
- Look for any HDMI, DVI, DisplayPort, or VGA connection
- Use any of your motherboard’s connections from the four mentioned above.
- Connect one end of the cable to the monitor and the other to the PC
- Start the PC
Even despite removing the graphics card, if the red led of the motherboard remains, then the motherboard has a defect.
How to Tell if the Motherboard Is Faulty or Dying?
The red motherboard light does not come all of a sudden. It is preceded by many signs and symptoms that all tout in the same direction that the motherboard is either bad or dying.
The most common sign of a bad motherboard is random freezes or crashes during use. If you have encountered random computer freezes prior to getting a red light, there is a high chance that your motherboard is not in the best condition.
The occurrence of the blue screen error is yet another very common symptom of a bad motherboard. Besides a bad motherboard, this error also signifies faulty PC hardware.
There are also other signs associated with a bad motherboard, which you can check in my in-depth article on how to tell if a motherboard is bad.
Long story short, a bad motherboard can be identified by random freezes or stutters, blue screen error, physical damage, or a lack of POST.
Verify that your motherboard is clear of all these signs because that could potentially mean that you have to replace your motherboard with a newer one.
FAQs
The red light issue of the motherboard can get very confusing, but don’t worry; I am here to answer some of your most frequently asked questions.
Related Guides
Check out some of our related motherboard buying guides.
- Top Motherboards for Ryzen 5 3600
- Top Motherboards for Ryzen 5 5600X
- Top Motherboards for Ryzen 7 5800X
- Top Motherboards for Ryzen 9 5900X
- Top Motherboards for Gaming
- Top B550 Motherboards
Check out some of the other related motherboard guides.
- What Are Front Panel Connectors?
- What are Motherboard Standoffs?
- How to Connect Front Panel Connectors to the Motherboard?
- How to Connect Power Button to Motherboard?
Final Thoughts
After reading the article, I hope you are better informed about the red light issue of the motherboard and won’t panic as much if you get it again on your PC.
A red light issue on the motherboard is quite hard to diagnose but using the methods and tricks mentioned above, you will not only diagnose but rectify it as well.
The five fixes can be used to make this error go away. Granted, the motherboard is working and not dead or faulty.
Before I sign off, let me know which type of red light error you were getting. Also, I would like to know what you ended up doing about it.
The Author Who Worked On This Article
James Gullett
James is an avid gamer turned tech enthusiast. His journey started in arcade centers when super smash bros was all the rave. It was not until he bought his first PC when his interest in technology grew substantially into a passion.