Want to know how to reset a motherboard back to its original state? In this article, I will enlist multiple methods that will allow you to reset the motherboard.
Resetting the motherboard is a foolproof way to rejuvenate it back to its original state. However, it should come as the last resort because it is tricky and you risk putting the motherboard into the red led state, recovering from which is quite impossible.
Don’t worry, though, as my step-by-step guide will be easy to follow, and I will make sure to simplify where required to break down some difficult technology terminologies. So, what are we waiting for? Let’s begin.
Some Important Motherboard Terminologies That You Should Know
The following terminologies will repeatedly be used in the upcoming methods; therefore, it is best to understand them now. Later on, they will only add to the confusion, which I don’t want.
BIOS
The one tech terminology that has become synonymous with a motherboard is the BIOS. In simple terms, the BIOS stands for Basic Input/Output.
The BIOS is just a miniature version of an operating system installed on your PC, except that it is for the motherboard.
The role of the BIOS is to act as a bridge between the hardware and the software side of the motherboard; therefore, it is tasked with providing users the information and control on certain aspects of the motherboard’s hardware.
In simple words, you can understand the BIOS as a mediator for your motherboard’s hardware. Of course, hardware cannot work optimally without software, and hence the BIOS fulfills the role of software for the motherboard.
For example, a motherboard’s hardware may allow for overclocking, but the hardware alone cannot decide on the overclock parameters. This is where the BIOS comes into play. It gives users control over the overclock and applies the final parameters to the hardware.
POST
Power On Self Test, in short POST, is a sub-branch of the BIOS that checks the parameters of the motherboard on boot.
It is tasked with identifying any error with the hardware when the PC boots, hence ensuring that the PC is in good shape.
For any error in the PC upon boot, the POST will ensure to acknowledge it by beeping. I am not sure if you have heard them, but the beeps on startup sign the POST utility in action.
These beeps are very important in troubleshooting a bad motherboard. I have an article on checking a bad motherboard in which identification by POST is a major method. You can check it out if you want more information regarding POST in general.
CMOS
Moving onto the star of our article today, the CMOS. The CMOS stands for Complementary Metal-Oxide-Semiconductor. This small microchip is where the BIOS of the motherboard is installed.
Hence you could say the CMOS is where the bulk of the motherboard data is installed, and that includes all your overclocking profiles, memory XMP, storage Raid information, etc.
Therefore, any change in the motherboard takes place in the CMOS space of the motherboard. Considering that, now you can see why the CMOS terminology is so important for us today because resetting the motherboard also involves clearing the CMOS.
Use the PC Case to Reset the CMOS
Some PCs allow users to reset the motherboard with the use of the reset button. Using the reset button to reset the CMOS requires no special tools and is a straightforward method. The following procedure can be used to reset the PC.
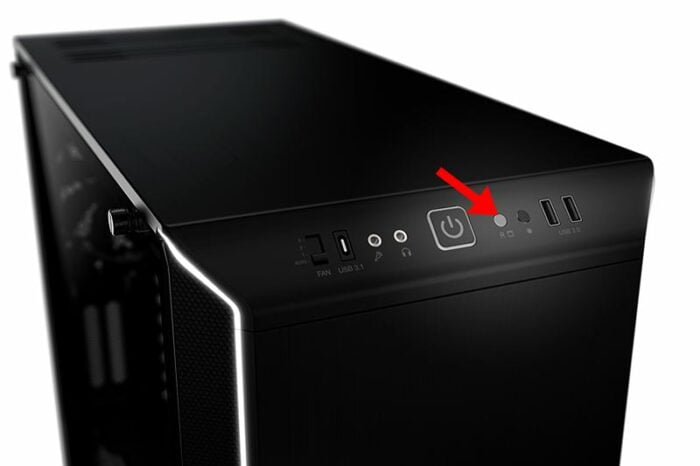
- Shutdown your computer
- Turn off the power supply of the PC. Ideally, you also want to disconnect the PC from the wall power socket
- Head to the front I/O ports of the button
- Besides the power button, there will be a small button labeled reset, which needs to be pressed to clear and reset CMOS
- Use any tool or gadget with a blunt end to press the button. Ideally, a screwdriver would do the job quite
- After letting the PC rest for 5-6 minutes, re-plug the cable of the PC and turn on the power supply
When resetting the CMOS via the PC reset button, make sure you are not pressing the PC for too long or too short. A good time frame is that you should press the button from 5-8 seconds and not more than that.
This method may or may not give you the desired results you are looking for, as the functionality and effectiveness of the reset button differ from PC to PC. If, after rebooting, your motherboard is not reset, then proceed to the next step.
Use the BIOS to Reset the Motherboard
Resetting the motherboard from the BIOS is the easiest, granted you have a working motherboard with access to BIOS.
If your motherboard qualifies for this method, you won’t need to fiddle with the hardware or remove some components to reset your motherboard, as this method will do all that with the help of software.
To reset your motherboard through the BIOS, do the following.
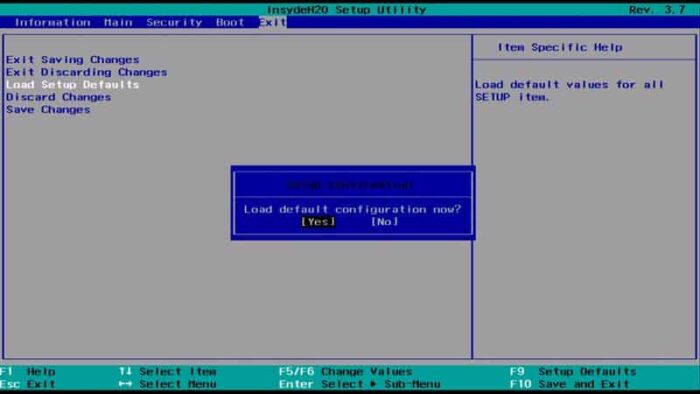
- Restart your PC
- Immediately upon restart, keep pressing the F2 or DEL button. You have to press these buttons until you are in the BIOS of your respective motherboard
- In the BIOS, head over to the system menu
- Here you have to locate the Setup default or load default configuration option
- Once you find either of them, click on it
- Now, follow the onscreen instructions (if any) to complete the process
- Once the process is completed, save and exit from the BIOS
After booting into Windows, your motherboard should be as good as new. If that is not the case, then proceed to the next method.
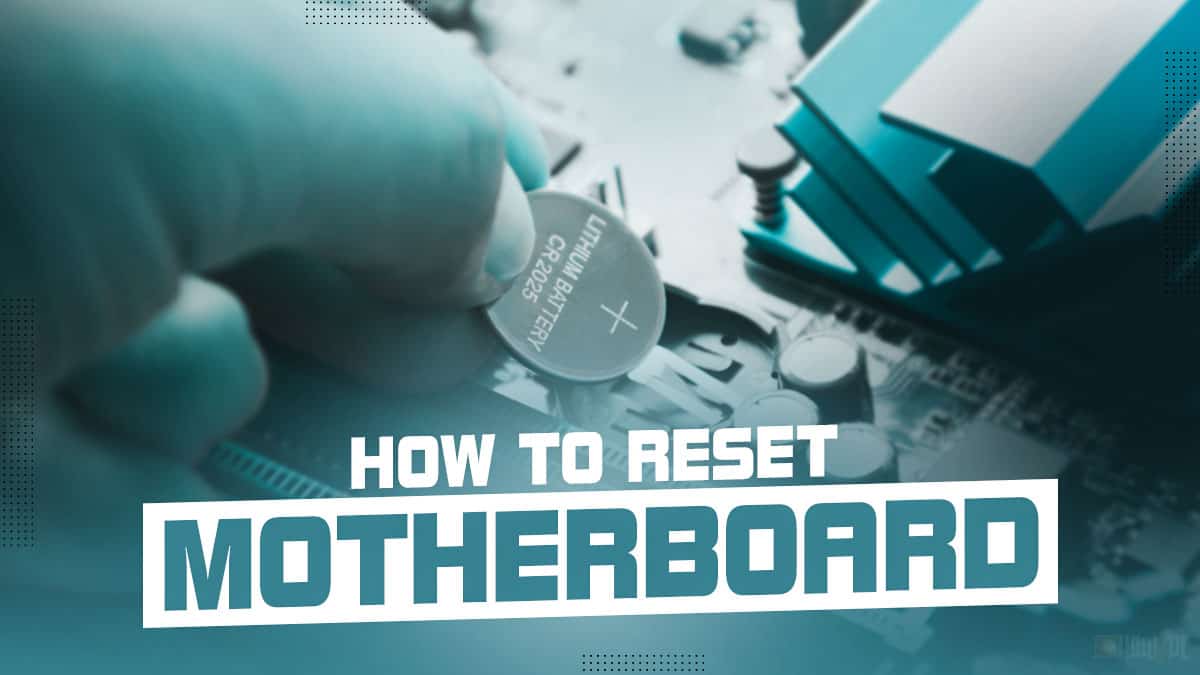
Remove the Motherboard CMOS Battery
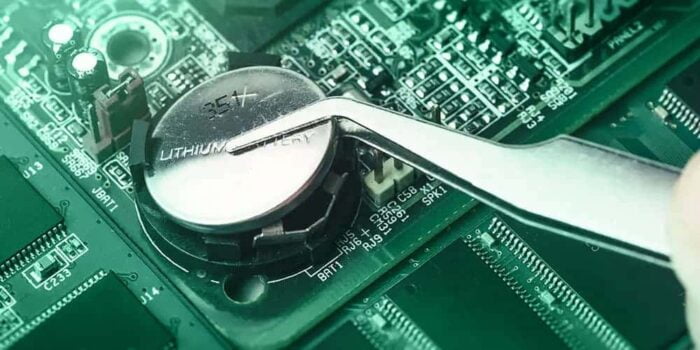
The simplest method that you can use to reset your motherboard is to remove the CMOS battery. The CMOS battery of the motherboard is a small cell battery inside the motherboard that is powering the CMOS chip, and once you remove the CMOS battery, all the electricity from the CMOS is discharged.
This method is only applicable if you want to reset the motherboard on a smaller scale and not factory reset the method. The method for removing the CMOS battery goes like this.
- Cut off the Power supply power by turning it off
- Put on your anti-static band and open the side panel of the side. To be extra cautious, disconnect your PC from the wall socket as well.
- Once the side panel is removed, locate the CMOS battery of the motherboard. I have attached a reference picture of the battery above, which will help you to figure out its location
- To remove the battery, push the pin opposite to the battery. Using a screwdriver for pushing the pin is much more convenient than using your nails.
- The battery should now pop out itself. If required, lift the battery from its mold and set it aside.
- Let the battery rest for at least 5 minutes
- After the 5 minutes have passed, you can insert the battery back into the motherboard
- When plugging it back in, ensure that you have the + side on the upside.
- Give the battery a slight nudge to seat it correctly in its position
Now, you can turn the PC on to see if the issue persists or not. If you are not satisfied with the results, proceed to the next step, which is a bit more advanced.
Use the Motherboard Jumper to Clear CMOS Manually
This method is the most effective and guarantees excellent results. While it may seem a handful, jumping your motherboard using the CMOS jumper is relatively easy.
If you are unaware, the jumper is basically a short terminal on a motherboard with a specific function. Therefore, when using the CMOS jumper, we will basically void the motherboard’s CMOS operation by breaking the circuit.
This will allow the motherboard to reset its CMOS, and hence what we will receive is a factory default motherboard.
To reset the motherboard by using the CMOS jumper, do the following.
- Turn off the power supply of the PC and disconnect it from the wall power
- Use the reference image above or the motherboard’s user manual to locate the motherboard’s CMOS jumper. It should have a JBAT1 or CLR_CMOS label around it, making it easier to locate
- Once located, remove the CMOS battery using the method mentioned above
- Now place the screwdriver in between the 2 pins of the jumper. The screwdriver should make simultaneous contact with both the pins.
- Keep the screwdriver on the pins for about 10 seconds
- Then wait another 2 minutes to plug in the CMOS battery
- After the battery is connected, turn on the Power Supply and boot up the PC
After using the CMOS jumper, your motherboard will now be on the factory settings. This should fix any issue you were having with your motherboard.
Use the Dedicated Clear CMOS Button on the Motherboard to Reset It
Some modern PCs will have a dedicated clear CMOS button either on the rear of the motherboard or on the motherboard itself. This CMOS clear button serves the same purpose as jumping the motherboard, which you learned about in step 4.
The only difference is that it is much more convenient to use a dedicated button than to jump the motherboard. Usually, the dedicated clear CMOS button is present on high-end motherboards like the Gigabyte X570 Aorus Xtreme.
The following is the procedure on how to use the dedicated clear CMOS button to reset the motherboard.
- Shutdown the PC
- Locate the button labeled with the Clear CMOS tag among the other rear I/O ports of the motherboard
- If you are unsure of whether this port is present on your motherboard, refer to the user manual of your respective motherboard.
- Press and hold the clear CMOS button for about 2 minutes
- This should start the motherboard reset process
- Wait for the process to finish, and then restart the PC
This is the last method for resetting the motherboard. If your motherboard still does not reset yet, then I am afraid there is a bigger problem with the motherboard that cannot be solved by resetting the motherboard.
What to Do if the Motherboard Fails to Reset and the Issue Still Persists
If even after resetting the motherboard, the issue is still there, I am afraid there is something wrong with your motherboard.
A motherboard is a very delicate piece of electronic equipment; therefore, a malfunction is not something out of the blue.
I have a complete article on how to check a bad motherboard, which you can check out if you need more information regarding a faulty motherboard.
I would advise you to see a certified professional and have the motherboard checked by him. If any major issue is found, I suggest replacing the motherboard entirely and not repairing it because motherboard repairs have proven unsuccessful most of the time.
FAQs
I am sure you have many questions regarding the motherboard reset process, so let’s answer the most popular ones.
Related Guides
Check out some of our related motherboard buying guides.
- Motherboard for Ryzen 5 3600
- Motherboard for Ryzen 5 5600X
- Motherboard for Ryzen 9 5900X
- Motherboard for Ryzen 7 5800X
- Motherboards for Gaming
- B550 Motherboards
Check out some of the other related motherboard guides.
- How to Check What Motherboard Do I Have
- How to Update Motherboard BIOS
- What Is a Motherboard
- How to Install Motherboard
- How to Upgrade a Motherboard
- What Does a Motherboard Do
- How to Update Motherboard Drivers
- How to Test a Motherboard
Final Thoughts
Now that we are finished with all the methods, it is time to put the article to rest. I hope that the guide on how to reset the motherboard I provided was of help to you.
To conclude, while there are five methods mentioned in the article, I reckon you should stick with the 4th method. This is because the 4th method addresses a complete reset of the motherboard and brings the motherboard back to its factory state.
Therefore, any issue present in the motherboard will be wiped away when the 4th method is applied to the motherboard.
Before I sign off, do let me know in the comment section if you have any other method for resetting a motherboard that you would like to be added to the list. Also, tell me about your favorite method from the three I have mentioned above.