Are you intrigued to know more about the motherboard? On paper, a motherboard may seem like a simple PC component, but deep inside, this PC component is far more intricate and complex than you think.
I know it may seem quite bogus to you, but after completely understanding what a motherboard is you will be surprised at the amount of things you didn’t know about this seemingly simple PC component.
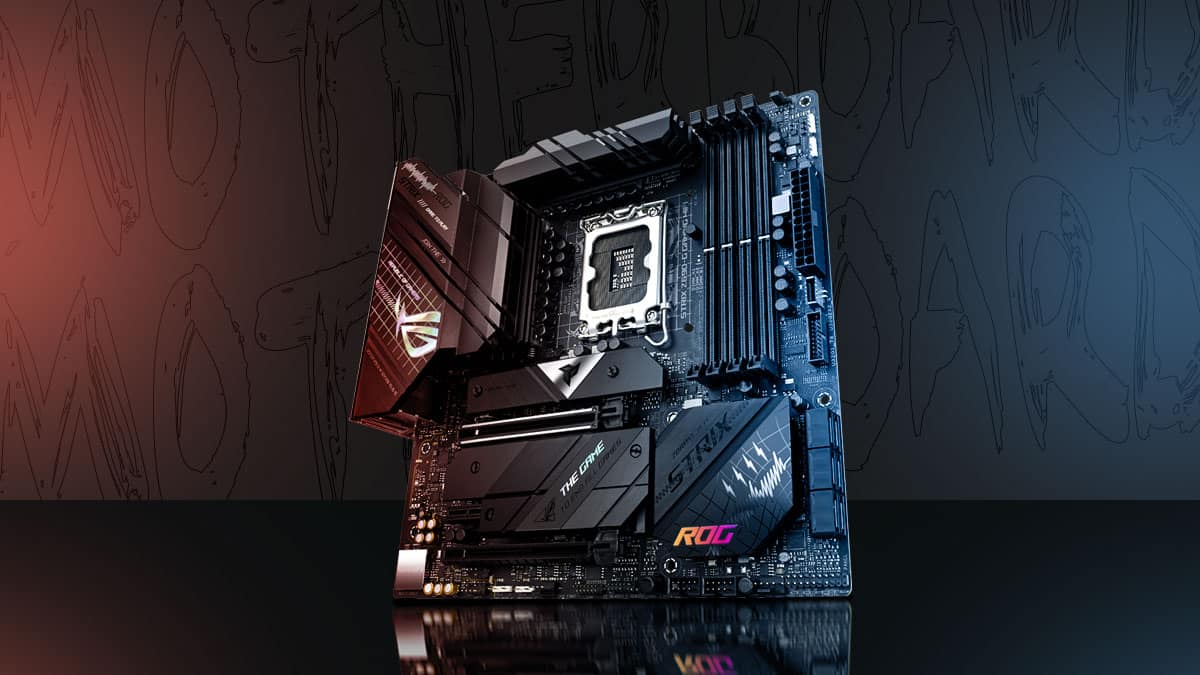
A motherboard is the computer’s main circuit board. It is tasked with providing connectivity for all the hardware components of the PC like the CPU, RAM, and GPU.
The thing is, this circuit has far more depth to it that can only be unearthed when we completely understand the motherboard and know what it truly is. So, without further ado, let’s begin.
The Motherboard Being the Circuit of the PC
No, I am not going to bore you with the definition of the motherboard, but rather, let’s see why the motherboard gets the name as being the circuit of the PC.
The motherboard is called the circuit of the PC because of its structure. If you simplify the motherboard, it consists of different sockets and slots bound together on a layer of copper.
We have the CPU socket, RAM slots, GPU slots, M.2 slots, etc. These are all sockets, albeit very complex ones.
Now, I think you have the idea why a motherboard is called the circuit of the PC because it is made up of many sockets that each have their own functions and work unanimously to achieve a more significant result.
A Brief Motherboard History
When computers were in their infancy, they were relatively simple machines. The computers of the early days were centered around one thing and couldn’t do much more than mathematical computing Data.
Slowly and gradually, this, however, changed. Computers started becoming more and more complex; therefore, a standard component was needed to act as a bridge between all the PC components.
Enter the 1980s era when the boom of personal computers was just on the horizon. IBM proposed the first modern motherboard that we see today in 1981 with the release of their personal PC.
A motherboard was the need of the time because the personal PC needed a way to communicate between all the components attached to it.
The name motherboard was not used for these circuit boards; instead, they were termed as planars. Many other names were also taken into consideration, but eventually, the dust settled on the word motherboard.
The folks over at IBM liked this name because it aligned with the functionality of the motherboard, which was to have a chip that could manage all the tasks of the PC. Essentially, the motherboard, in simple words, is the mother of the computer because it plays the role of a motherboard by having multiple other components of the PC attached to it.
What Are the Components That Make up the Motherboard?
Regardless of the make, model, or brand, every motherboard has some core components. Without these components, a motherboard cannot be called a motherboard, nor can it perform its task.
The main components of a motherboard are as follows:
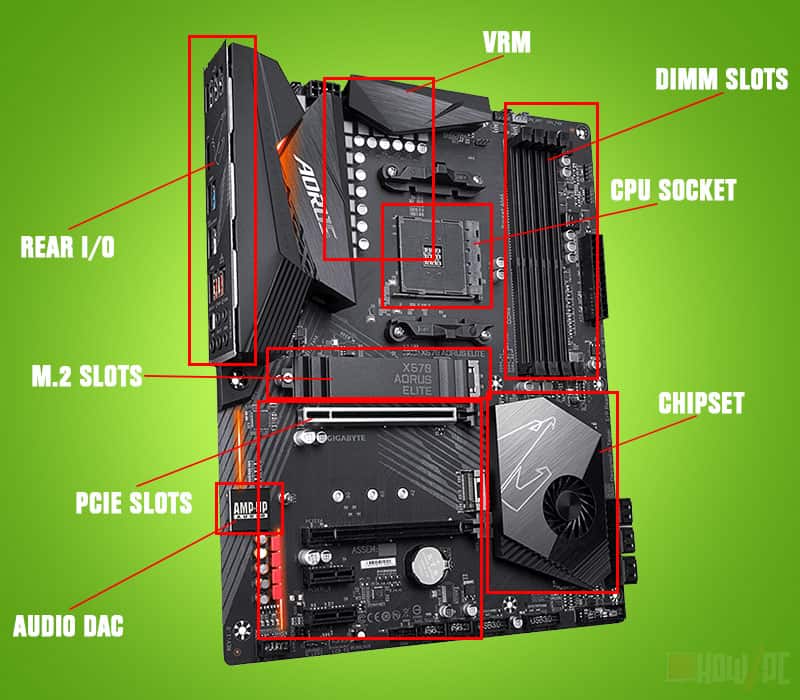
Chipset
The chipset located at the bottom of the motherboard is the motherboard’s central controller. A motherboard is represented by its chipset.
For example, MSI B550 Tomahawk. B550 is the chipset of this motherboard.
VRM
The VRM is the power phase of the motherboard. This motherboard component is essential because it is tasked with supplying current to the motherboard. Therefore, a motherboard, at the very least, should have a very good VRM to qualify for a quality board.
CPU Socket
The CPU socket is the essential component of the motherboard that is at the center of all the motherboard functionality.
DIMM Slots
The DIMM slots or RAM slots is located on the motherboard’s right side. These RAM slots are the long slit-type sockets embedded into the motherboard.
PCIe Slots
The PCIe expansion slots are under the CPU socket. The shape of the PCIe slot is the same as the RAM slot except that they come in four different sizes: x16, x8, x4, and x1. These expansion slots are used to connect the GPU, sound cards, video cards, etc. Typically in a motherboard, there are anywhere from 2 to 8 PCIe slots.
M.2 Slots
The M.2 slot is located near the PCIe slots. This socket has similar to the PCIe socket with minimal differences.
Audio DAC
An audio DAC is an integral component of the motherboard because no audio of the computer can be processed without it. The audio DAC is located at the bottom left of the motherboard.
Headers and Ports
The motherboard also has various headers attached to it that are necessary to connect the different components of the PC.
For example, the CPU needs to connect to the PC’s power supply to function, and for that, the motherboard has a CPU power header.
Besides allowing the different components to connect, a motherboard also acts as a mediator component.
For example, the CPU is connected directly to the motherboard via the CPU socket, but the CPU fan is connected via the fan header on the motherboard.
Many other functional bits are only possible because of a motherboard. It can be said that the motherboard is the component that allows other components of the PC to excel.
Rear I/O
I/O, short for Input and Output, refers to the ports situated at the back of the motherboard. These ports consist of commonly used connections like USB, Ethernet, HDMI, Audio out, VGA, PS/2, etc.
Basically, the rear I/O is used to connect the motherboard to external gadgets like a monitor, mouse, keyboard, speakers, etc. Without the rear I/O, the PC will be of no avail because it won’t be able to connect to these external gadgets.
Jumpers
The jumpers are found in many places on the motherboard. These basically close the circuit of a PC, resulting in the flow of electricity.
The jumpers are useful because sometimes it is necessary to break the circuit. For example, in the case of resetting a motherboard, it is necessary to short the CMOS jumper to clear the motherboard.
What Are the Different Form Factors of a Motherboard?
Motherboards are distinguished by their form factor. Depending on the form factor, motherboards are positioned into different categories, and these categories are the following.
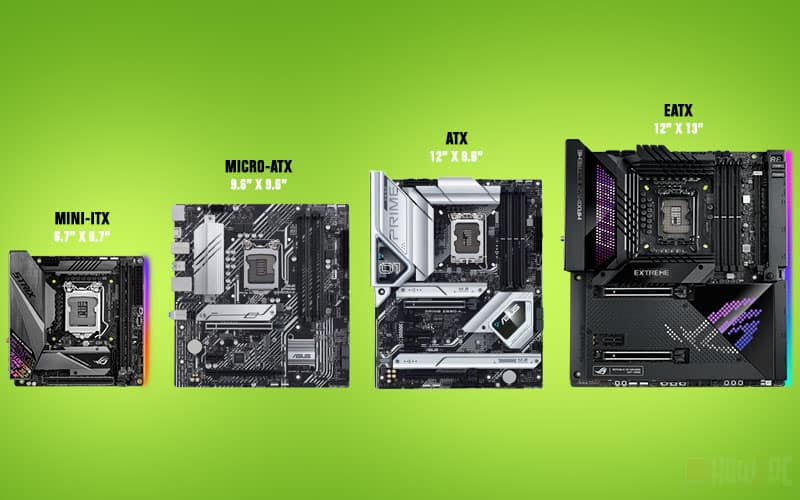
EATX
The EATX motherboards are the largest of the bunch. They are introduced recently with the release of the PCIe 4.0 protocol. The EATX motherboards are 12 by 13 inches meaning that they are 12 inches in length and 13 inches in width.
The extra width is a must to fit in the additional cooling for the motherboard chipset. This cooling is typically in the form of a physical fan with heatsinks running throughout the length of the motherboard.
PCIe 4.0 motherboards like the Asus X570 Dark Hero or the Gigabyte Z690 Aorus can get very hot and need beefy cooling solutions. This is where EATX motherboards come into the picture. All X570 and Z690 motherboards have the EATX form factor.
ATX
The ATX form factor is also commonly referred to as the standard form factor for the motherboard. These motherboards are 12 by 9.6 inches meaning that they are 12 inches in length and 9.6 inches in width.
This size has become the industry standard and is why people gravitate towards getting an ATX motherboard because support for this form factor is the greatest.
Micro-ATX
The Micro-ATX form factor sits between the ATX and the Mini-ITX form factor. It is not as large as the former while not as small as the latter. Therefore, it blends in a good mix of compact size and functionality, and practicality.
A Micro-ATX motherboard has a size of 9.6 by 9.6 inches meaning that it has a length of 9.6 inches and a width of 9.6 inches as well. Micro-ATX is used for compact PCs made for desk use in offices or other professional environments since they take up less space.
Mini-ITX
The Mini-ITX motherboards are the smallest of the bunch. These motherboards don’t offer much functionality and have a limited number of ports.
The Mini-ITX motherboards have a size of 6.7 by 6.7 inches meaning that they have a length of 6.7 inches and a width of 6.7 inches.
These motherboards are typically used in specialized portable gaming PC builds. Due to their limited mainstream usage, these motherboards have the least amount of aftermarket support; therefore, it is best to stay away from them if you are a newbie.
How Does a Motherboard Connect to the Computer Case?
I am sure you are eager to know how a motherboard connects to a PC. So, let’s keep the technical bits to the side and address this.
A motherboard connects to the PC with the use of motherboard standoffs screws. These screws are very special and distinct in their function. Besides the motherboard, they are not found in any PC parts.
These screws have a two-phase design. One phase connects to the motherboard, and the second is screwed on top of it. This construction allows the screw to rest above the PC case. The motherboard is then aligned with the standoffs, which are then screwed in.
If you want to know more about motherboard standoffs screws, then refer to my in-depth article on what are motherboard standoffs.
How to Upgrade Your Motherboard?
A motherboard is not the PC component you want to upgrade often. Since all other components are connected to a motherboard, upgrading the motherboard is difficult and requires the removal of all the other PC components. There may also be a chance that the new motherboard you buy is not compatible with your existing hardware.
This is the reason I am not in favor of upgrading motherboards. It is better to buy the best possible motherboard for your PC and keep it long-term. However, there is no objection in upgrading the other PC components attached to a motherboard.
To access a motherboard, you first need to remove the side panel of your PC. This is done by unscrewing the thumb screws holding the case side panel. Once the side panel is removed, you will have uninterrupted access to your PC’s motherboard.
The CPU socket is the recessed socket with pins but you wouldn’t be able to see it because of the cooler that is attached on top of the CPU. This CPU cooler needs to be removed in order to have access to the CPU.
The RAM is to the right, and down below the CPU socket are the GPU slots and the M.2 slots. The most accessible component to upgrade is the RAM. You can remove or add more RAM anytime with relative ease.
The same can also be said for the GPU and M.2. However, these both will take a bit more effort than the RAM. You can upgrade these components without any problem, but the issue arises when upgrading the whole motherboard itself.
If you still want to upgrade your motherboard, refer to my in-depth guide on how to upgrade a motherboard for comprehensive information.
FAQs
You folks have asked many questions regarding the motherboard, so I will answer a few of them now.
Related Guides
Check out some of our related motherboard buying guides.
- Ryzen 5 3600 Motherboards
- Ryzen 5 5600X Motherboards
- Ryzen 9 5900X Motherboards
- Ryzen 7 5800X Motherboards
- Best Motherboard for Gaming
- Best B550 Motherboard (For Every Budget)
Check out some of the other related motherboard guides.
- How to Check What Motherboard Do I Have
- How to Update Motherboard BIOS
- How to Install Motherboard
- How to Upgrade a Motherboard
- What Does a Motherboard Do
- How to Update Motherboard Drivers
Conclusion
There was a lot to cover regarding the motherboard, and with the last FAQ section down, it is time to wrap the article.
After going through the complete article, I reckon you, like me, can also begin to appreciate this simple PC component that plays such a huge role and keeps all the PC components connected and functioning.
Before I sign off, let me know in the comment section down below which motherboard you are using on your PC.