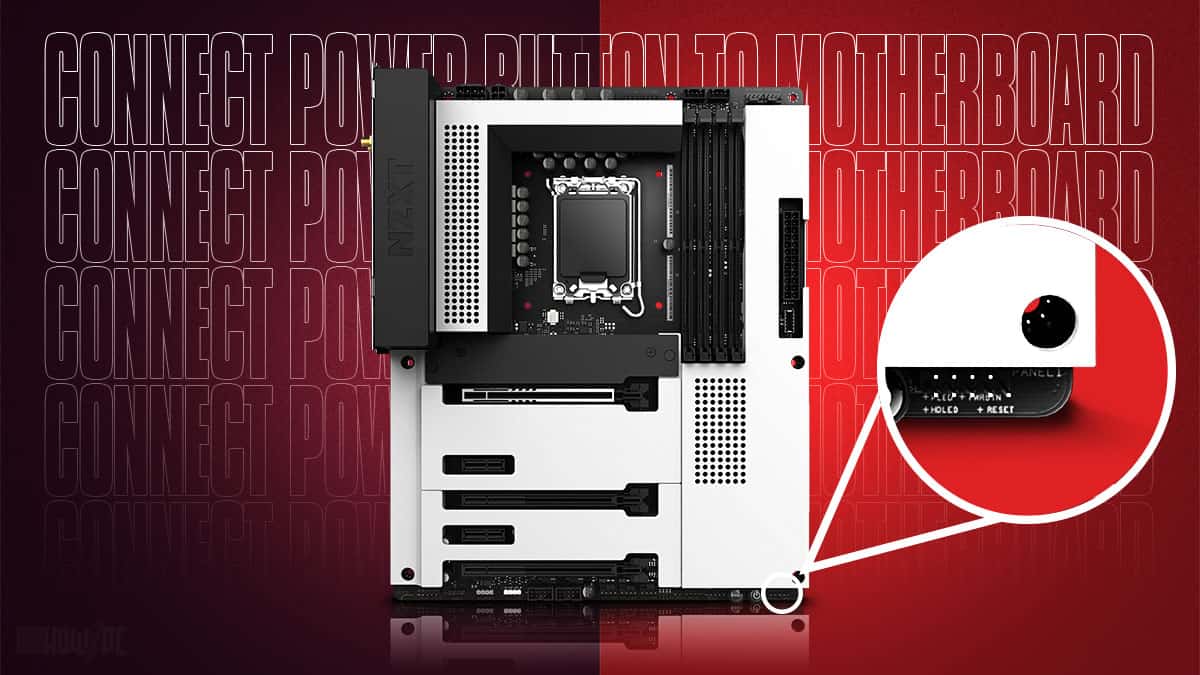
Are you looking into ways to connect the power button to the motherboard? It is quite annoying not being able to turn on the PC due to a non-functioning power button.
Don’t worry, though, because I will provide you with an easy in-depth guide on how to connect the power button to the motherboard.
To connect the power button to the motherboard, you will need to locate the correct PW+ and PW- pins on the motherboard. Connecting the power button wires to the PW+ and PW- pins allows you to turn on or turn off the motherboard using the power button.
The front panel header, where the PW+ and PW- pins are situated, is located at the motherboard’s bottom chin near the graphics card.
This was just an overview, so don’t fret if you are getting confused. I am going to take you along with each step of this procedure. So, let’s get started.
Getting the Preliminary Jargon Out of the Way
I will be using these terms consistently throughout the guide, so having a grip over them will help you immensely. These terms are as follows:
1. Motherboard’s User Manual
The motherboard’s user manual is a get-started guide. It comes with all the necessary information about the motherboard and has its complete specs.
Keep the motherboard manual with you because we will be using it frequently to locate the position of the front panel header.
The hard copy of the motherboard’s user manual comes in its packaging. However, if you don’t have the motherboard box lying around, you can download its soft copy.
I will tell you how you can download it later in the article. For now, all you need to know is that the motherboard’s user manual is a spec sheet containing all its information, including the location of the ports.
2. Electrical Pins
Electronic components such as PCBs have pins. These pins conduct electricity for different tasks and purposes. In this article, I will be using “pin” frequently when referring to the individual connections of the front panel header.
For example, the power button cable will be connected to the motherboard’s power switch pins or SW_PW pins. Similarly, like the power button, there can be pins for different connections, e.g., USB ports, motherboard fans, etc.
3. Header
A header is a block that is formed by the combination of several male pins. For example, the front panel header has power pins, reset pins, LED pins, etc.
The pins in the header can perform the same function or have multiple different purposes. For example, the pins in the front panel header have different purposes. While the pins of the USB 2.0 header work in tandem for the same purpose.
4. Jumper Cables
PC components need a way to connect to one another, and this is done through cables. For example, the ATX power cable connects the power supply to the motherboard.
Some connections like the power button have separate – and + cables. Such cables are called jumper cables.
For example, the power button has 2 cables, one of which connects to the PW+ pin while the other connects to the PW- pin.
How to Connect the Power Button to the Motherboard?
Now that we have got the confusing terms out of the way, let’s dive into the method for connecting the power button to the motherboard.
Step 1: Locate the Front Panel Header
The first step in connecting the power button to the motherboard is locating the front panel header. We will be doing this because the pins to which the power button will be connected are located on the front panel header of the motherboard.
To keep the article concise, I won’t be going into much detail about the front panel connector. Refer to my in-depth article on front panel connectors if you need more information.
There are two ways you can use to locate the front panel header, those being;
- Using the motherboard’s user manual
- Manually inspecting the motherboard and searching for the front panel header
While both of them will provide you the location of the front panel connector on the motherboard, personally, I like using the motherboard’s user manual more because it is the quicker way.
Using the Motherboard’s User Manual
Remember, I told you earlier that we will be using the motherboard’s user manual to locate the position of the front panel connectors. Well, I wasn’t lying.
If you have your motherboard’s user manual – well and good. In any other case, we can download its soft copy through the motherboard manufacturer’s website.
To download the soft copy of your motherboard’s user manual, do the following.
- Head over to your motherboard’s manufacturer’s website
- Search for your motherboard make and model number
- Head to the support section for your motherboard
- Click on the motherboard manual and download it.
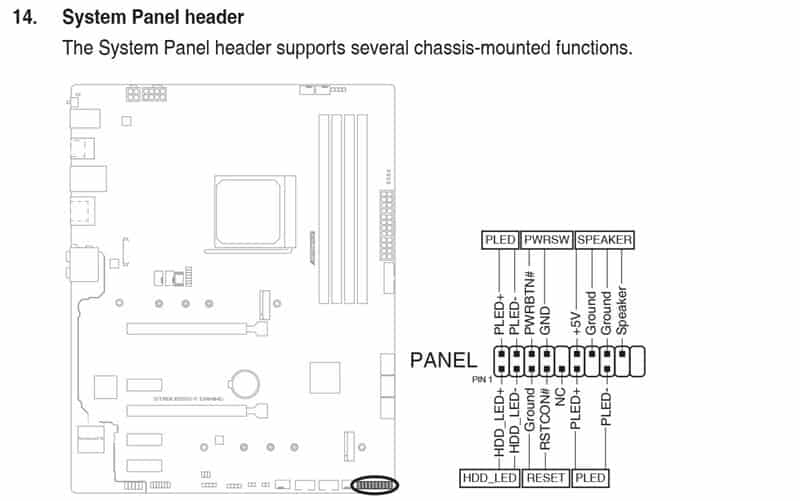
Once the motherboard’s user manual is downloaded and opened, flip to the page with information on the internal ports. There will be a diagram of your motherboard on that page, with the front panel header labeled clearly.
The location of the front panel header is not enough. We also need to know which pin represents which connection in the front panel header. For that purpose, navigate to the page with specific information on the front panel header.
The picture of your motherboard’s user manual will closely resemble the one down below.
We will need this page again, so fold it over to open it quickly when it is required again.
Manually Inspecting and Searching the Motherboard to Locate the Front Panel Connector
If you can’t find your motherboard’s user manual, you have to physically find it by looking for it on the motherboard.
Typically, the front panel header is located at the bottom of the motherboard. So, begin your search from the motherboard’s bottom chin and crawl your way up.
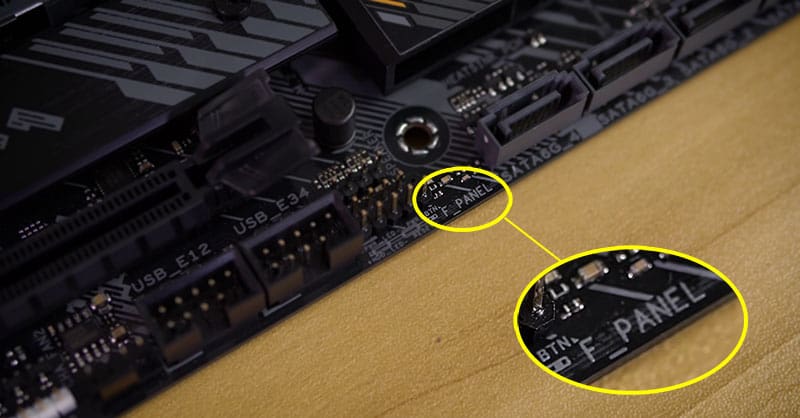
The front panel header will be labeled as F_Panel or front_panel, so it is not that hard to locate if you look closely.
Step 2: Locate the Pins to Which the Power Button Will Attach Too
To locate the PINs to which the power button will attach, we will use the page we had folded in the previous step on the motherboard’s user manual. There was a reason why I told you to fold this page, and you will be thanking me now.
The front panel connector has the following pins:
- Power Switch
- Reset Switch
- Power LED
- Hard Disk LED
- Beep Code Speaker
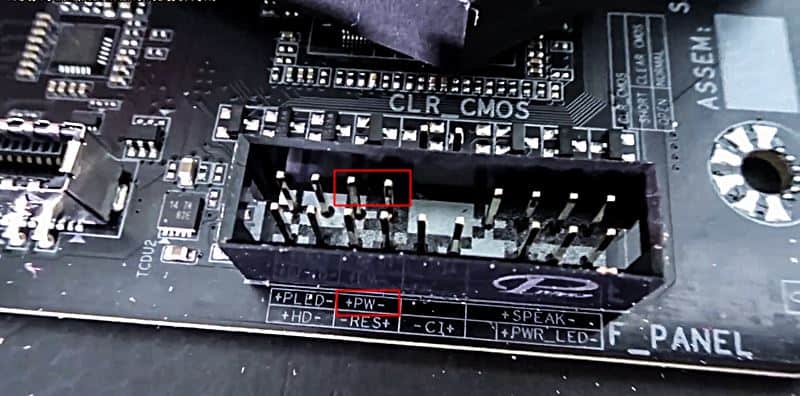
We are interested in the position of the power switch pins because these are the ones we will be using to complete this process.
To know this, open the folded page of your motherboard’s user manual, which will have a picture like this.
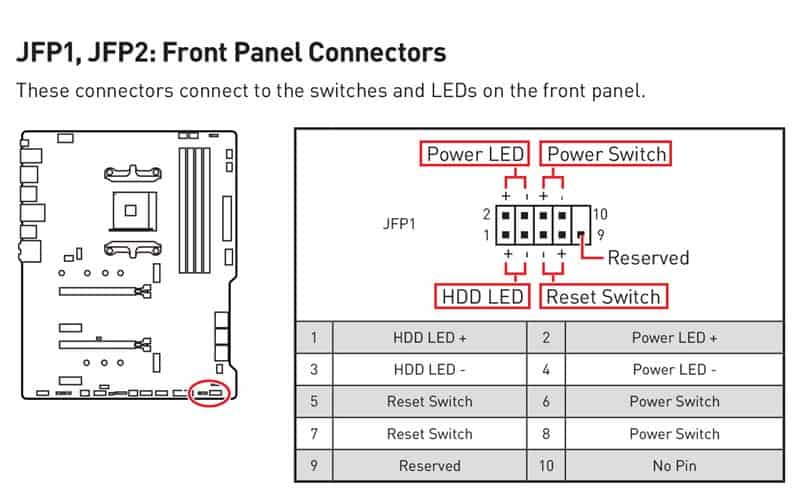
The power switch pins are labeled in the picture. Correlate the label with your motherboard, and you can locate the power switch’s position.
To verify, check the label beside the front panel header of your motherboard. Every front panel header will have a label showing which pin corresponds to which connection.
If the label you are looking at points to the same location for the power switch as the motherboard’s user manual, you are at the correct pins.
Generally speaking, the third and the fourth pins from the top left correspond to the power switch.
Step 3: Connect the Cable From the Power Button to the Power Switch Pins
Now that we have located the power switch pins, all that is left to do is plug the wire into them to connect the power button to the motherboard.
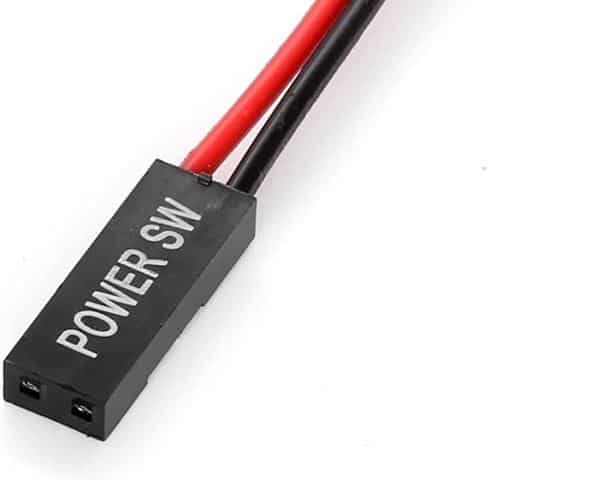
Okay, before you get ahead of yourself and plug in the wrong cable, ensure that the cable has Power SW written on it. If you plug in any other cable than this, you won’t receive a favorable result. Therefore, only plug the Power SW cable into the power switch pins.
Does Polarity (+/-) On the Power Button Cables Really Matter?
If you are paying close attention, you might have noticed the two individual cables coming out of the power button.
In electronics terminology, you always have a + and a – terminal when dealing with cables. Although the power cables also have the + and – terminals, polarity does not really matter here.
This is because power cables are combined into a single cable, and their orientation does not really matter.
Therefore, as long as you connect them properly with the right front panel header pins, you won’t encounter any problems.
However, bear in mind that while polarity does not matter for the power button jumper, it does matter for other electrical connections of your motherboard.
For example, when connecting LED light jumpers on the front panel header, you should take extra care to get the + and the – pins properly set up. Plug the positive jumper into the + pin and the negative jumper into the – pin on the motherboard because otherwise, it will not work.
Other Ways to Turn on the Motherboard Without the Power Button
If you don’t have the power button connected to the motherboard but still want to turn on the motherboard in a pinch, don’t worry. Coming up next are some handy ways by which you can turn on the motherboard without the use of the power button.
Jump-start the Motherboard
Jump-starting the motherboard is fairly straightforward – there is no rocket science involved. All you need is a screwdriver and your wits.
To jump-start the motherboard, do the following.
- Navigate to the front panel header of the motherboard
- Place your screwdriver between two power switch pins. The screwdriver should make contact with both pins simultaneously.
- Hold the screwdriver in place for 2-3 seconds, and it should start your motherboard.
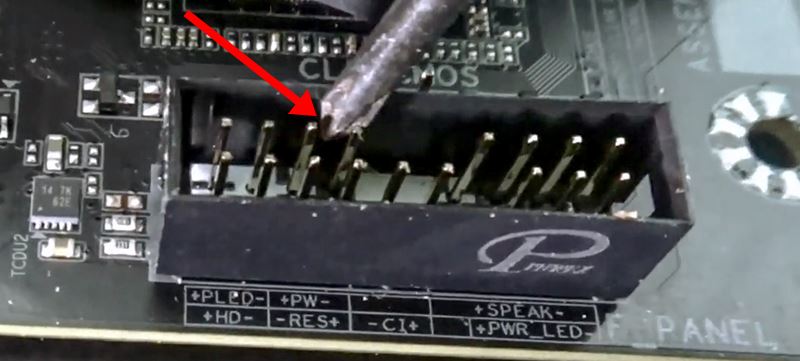
While jump-starting the motherboard, ensure your screwdriver only makes contact with the power switch pins and not any other ones in the front panel header. For added assurance, remember to use a small flat head screwdriver, which is barely enough length to touch the two pins, as shown in the picture below.
Use a Standalone Power Switch Cables
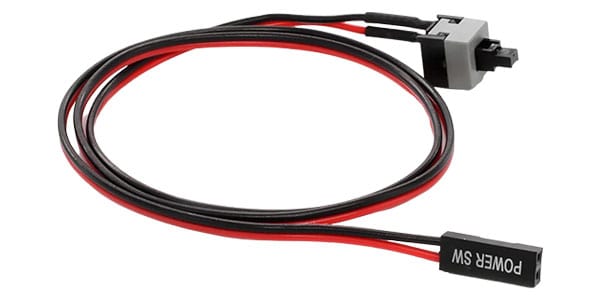
The power switch cable serves as an alternative to the power button. These cables simulate the working of a physical power button and are quite cheap to get a hold of. For under $5, you can get a pack of three cables which will serve you a lifetime.
They are fairly simple and easy to use. The cable consists of two ends. One end has the jumper cables that connect to the power switch pins of the motherboard. Meanwhile, the other end has a physical pusher, which you press like the power button.
Connect the power switch cables to the motherboard’s power switch pins – two pins located on the front panel header. Once the cables are locked in place, press the pusher to turn on the motherboard.
Contrary to jump-starting the motherboard, this method is much safer. It does not involve touching the motherboard, so there is a lot less chance of something going terribly wrong. Therefore, invest the $5 and buy the power switch cable.
FAQs
Is It Possible to Turn on the Motherboard Without the Power Button?
Yes, turning on the motherboard without the power button is possible. You can turn on the motherboard without the power button in two ways.
- Manually jump-starting the motherboard
- Using a power switch cable
Both of these methods are fairly straightforward and work with guaranteed success. However, I recommend using the power switch cable method because it is safer and more efficient. Only use the manual jump-starting method for turning on the motherboard in a pinch.
Where Do the Power Button Cables Connect to the Motherboard?
The power button cables connect to the PWR SW pins, which are located on the front panel header of the motherboard. The front panel header is at the motherboard’s bottom chin, along the graphics card slot.
Do Motherboards Come With an Alternate Power Button?
Motherboards do not come with alternate power buttons. Most of the mainstream consumer motherboards in our PCs are fairly basic and, therefore, have no physical power button on the motherboard for turning them on.
However, enterprise motherboards and some high-end consumer motherboards like the Asus ROG Maximus Extreme – the best high-end motherboard you can buy, come with a physical power button.
What to Do When the PC Is Not Turning On Even After Connecting the Power Button to the Motherboard?
The PC that is not turning on even after the power button cables are connected correctly may have loose connectors or a faulty power supply.
To solve this issue, do the following.
- Ensure the power button cables are correctly seated where they combine into a single jumper.
- Ensure the 24-pin ATX power connector – the cable connecting the motherboard to the power supply is connected properly. The 24-pin cable should fit snugly into the corresponding header, and all the pins should make contact
- Ensure that the 8-pin CPU connector – the cable that connects the CPU to the power supply, is connected securely.
- Check for any signs of damage or tear in the power button cable
- Inspect any signs of damage on the motherboard
Can I Turn off the Motherboard Without the Power Button?
Yes, turning off the motherboard without the power button is possible. The process for it is the opposite of starting the motherboard. It is as follows:
- Grab yourself a screwdriver
- Navigate to the power switch pins of the front panel header
- Push the screwdriver against the two power switch pins. The screwdriver should touch both of the pins simultaneously
- Hold the screwdriver in place for 4-5 seconds
- You should hear a beep, which will be followed up by the motherboard turning off.
Alternatively, you could also use the power switch cable to turn off the motherboard without the power button. It just requires the push of a button; however, you will first need to buy the power switch cable. Luckily it is very cheap and costs under $5.
Related Guides
Check out some of our related motherboard buying guides.
- Best Motherboard for Ryzen 5 3600
- Best Motherboard for Ryzen 5 5600X
- Best Motherboard for Ryzen 7 5800X
- Best Motherboard for Ryzen 9 5900X
- Best Motherboard for Gaming
- Best B550 Motherboard
Check out some of the other related motherboard guides.
- What Are Front Panel Connectors?
- What are Motherboard Standoffs?
- How to Connect Front Panel Connectors to the Motherboard?
- What the Red Light on a Motherboard Means?
- What Are PCIe Slots?
- How to Tell if Motherboard Is Dead or Bad?
Final Thoughts
With all the information now covered, I reckon you have quite the idea on how to connect the power button to the motherboard.
As demonstrated, connecting the power button to the motherboard is fairly straightforward.
If you take hints from your motherboard’s user manual and follow my guide, you will complete this process in under 30 minutes.
However, if you feel intimidated or overwhelmed, feel free to chime in with your query in the comment section. I will help you, and together we will get the problem sorted out in no time.
Of the two, my favorite way is to use the power switch cable because it is a lot easier and hassle-free than jump-starting your motherboard every time.
To conclude, take your time, see things through, and take this process one step at a time. I hope you found the information in this article helpful. Before signing off, do let me know if you were able to connect the power button to the motherboard.
The Author Who Worked On This Article
Waleed Madni
A tech enthusiast with the spirit of a competitive gamer. Waleed has been around computers ever since he was young and has witnessed the progress of the machines he loves the most. Fascinated by what tomorrow has to offer, he keeps himself up to date with the latest technology and gaming trends.