Is your motherboard being finicky or displaying all sorts of abnormal behavior? If I were you, I might be pulling my hair out.
A motherboard is a complex piece of hardware – yes, but that doesn’t stop you from knowing if the motherboard in your PC is bad or if it is configured incorrectly.
Today, I will tell you how you can fully diagnose your motherboard and assess its condition. So, all the freezes and weird shenanigans you have going on – are nothing to worry about.
A motherboard is the heart of the computer, bearing the great responsibility of integrating all the different components and allowing the computer to function.
A computer restarting out of the blue or freezing randomly indicates a bad motherboard. Other signs include the infamous blue screen error and the PC’s extremely slow response. Also, severe problem with the motherboard might not cause the PC to turn on.
All these are symptoms of a bad or dead motherboard, but there is much more than meets the eye. So, let’s find that out, shall we?
Is Your Motherboard Really Bad or Misconfigured?
Don’t get me wrong; I am not saying you are not facing issues with your motherboard. However, they can be due to a misconfigured motherboard rather than a faulty motherboard.
A motherboard is a delicate component with many intricate settings. A slight change in any of them, for example, the core voltage, can drastically unbalance the motherboard and cause the symptoms you are facing.
At first glance, you might be unable to tell which problem you are dealing with – a bad or misconfigured motherboard. With a bit of software trickery, you can fix a misconfigured motherboard without ever needing to run expensive repairs or outright replace the darn thing; hence it doesn’t hurt checking for one.
With a teeny weeny help from a co-worker – a software wizard, I might add. We have compiled a rundown of how you can identify a misconfigured motherboard and what you can do to solve it.
What Are the Symptoms of a Misconfigured Motherboard?
Identifying a misconfigured motherboard can be difficult – but it is not impossible. Therefore, I have gathered simple and practical ways for this task, which are as follows:
1. Instability Due to Overclocking
If your PC is constantly crashing and turning off randomly – then the culprit behind this is a bad overclock.
An overclock is when you increase the voltage going to a PC component, like the CPU, to get extra performance. The CPU is not the only component that can be overclocked – the RAM and GPU are also used for the purpose of overclocking.
Extra voltage results in higher heat generation leading to instability. Not all motherboards are designed to handle an overclock. You need a specific motherboard with a high-power VRM and robust power delivery.
Even if you have not overclocked any components yourself, some of the components come overclocked from the factory.
If you need more information on overclocking, you can check out my in-depth overclocking guide – however, if you are confident, let’s hop into the motherboard BIOS and solve this issue.
Methods for Fixing the Overclocking the Issue
To enter the motherboard BIOS, press the DEL, F2, or the F10 key at the time of PC startup.
In the BIOS, you need to navigate to the CPU tab. There are two ways by which you can fix an overclock.
Method 1
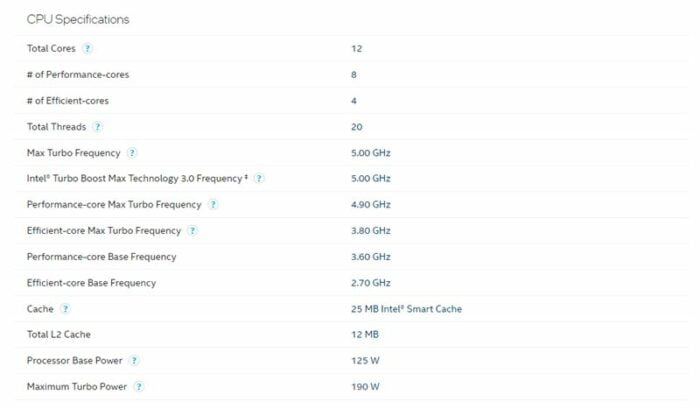
Firstly, we will try resetting an overclock manually. For that, head over to the CPU core clock and CPU core voltage options. For your particular CPU result, the values of the core clock and the core voltage to default.
To find out the default CPU core clock and CPU core voltage for your respective CPU model, head over to the manufacturer’s website and check the CPU specs. I have attached a picture down below showcasing the core clock speed and voltage of an Intel Core-i7 12700K.
While you are resetting the CPU overclock, you might as well check the RAM overclock as well and reverse it if it exists.
You need to find the setting with the name of XMP – the RAM’s overlock profile. It should be in the RAM section of the BIOS. The XMP should be disabled – if it is enabled, turn it off.
Once you have reset the overclock and want to exit the BIOS, click on the save and exit option. Doing so will restart the PC and take you to the Windows starting screen.
Method 2
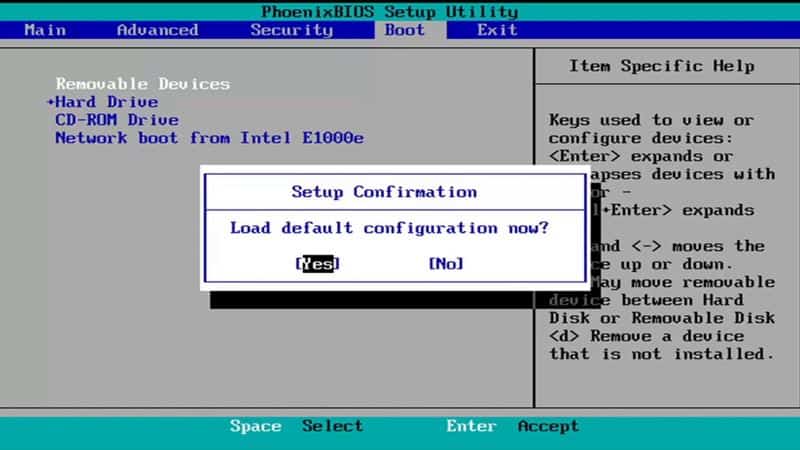
There is also a way to automatically reset an overclock which is a lot more convenient. In the BIOS, navigate to the load default configuration option and click on yes.
Note: In some BIOS, the load default configuration option is labeled as the restore defaults option.
Before you click on it, let me tell you using this option will reset the entire motherboard settings to default. So, if you made any prior changes to the motherboard settings – they all will be lost.
If you are okay with losing all your settings, you can proceed with this option, as it is the most convenient one out of the lot.
2. Buggy Windows Update
I bet you have updated your PC to Windows 11, or you might have recently updated your Windows because they can also malfunction the motherboard.
The newest Windows updates are not always stable – they contain bugs, have wrong source code, etc. In addition, a motherboard is heavily reliant on Windows to communicate with the rest of the PC’s components. Hence, any interruption in the connection can prove to be very bad for the motherboard.
3. PC Components Not Properly Connected to the Motherboard
There are a myriad of PC components connected to the motherboard. As we all know, connections can become loose over time. As a result, a motherboard can exhibit unusual behavior if any important component, like the RAM or the CPU is not connected correctly.
In electronic connections, the power goes through the electrical pins. These electrical pins are very small and minute; such is the fact that all PC components, like the CPU or the RAM can have multiple electrical pins.
Hence knowing if these pins are appropriately connected just by eyeballing is quite hard. Therefore, I suggest you remove the RAM and CPU from their respective sockets and install them again, especially if facing the Blue screen of death issue.
It doesn’t hurt doing so and brings peace of mind that you have crossed off another possible plausible issue.
If you don’t know how to remove these components, then refer to an in-depth guide on how to build a gaming PC.
The expansion cards, including the GPU, are also prone to this problem. This is because GPU – or other expansion cards for that matter, are heavy and can become loose from the PCIe slot.
So, if your expansion card is not detected – spare the PCIe slot because it’s not always its fault. Sometimes, all you need is a good shove, and the connection between the PCIe slot and your GPU should be good.
4. BIOS or Other Driver Updates That You Might Have Installed on the Motherboard
I get it – keeping the motherboard up to date is usually a good practice. However, sometimes updating the BIOS or other drivers of the motherboard can cause the motherboard to malfunction.
The new updates add new features – which is great. However, not all of these features will be compatible with your PC, which is where the problem starts. Remember, when talking about compatibility, we see the full PC, not just the motherboard.
What Are the Symptoms of a Bad Motherboard?
Okay, so you have gone through all the notions for misconfiguration, but none of them apply to your motherboard. Well, great – not because your motherboard is bad, just that we can now surely say there is something wrong with the motherboard.
Still not convinced! The following are some of the symptoms of a dead or bad motherboard.
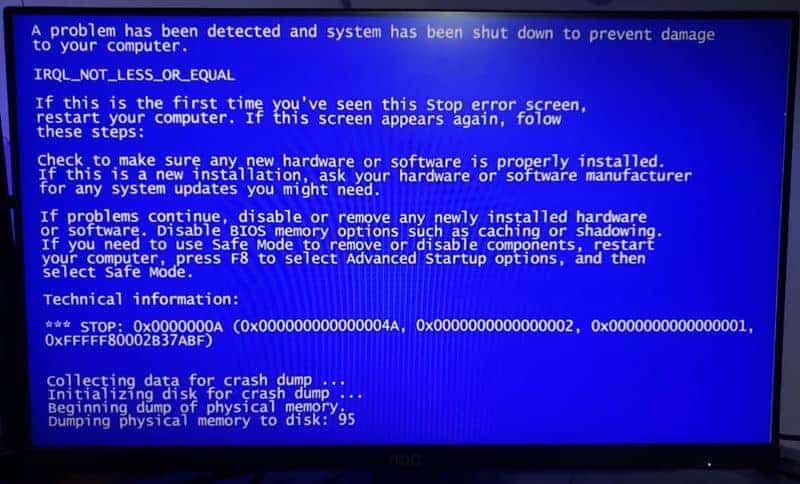
1. Blue Screen
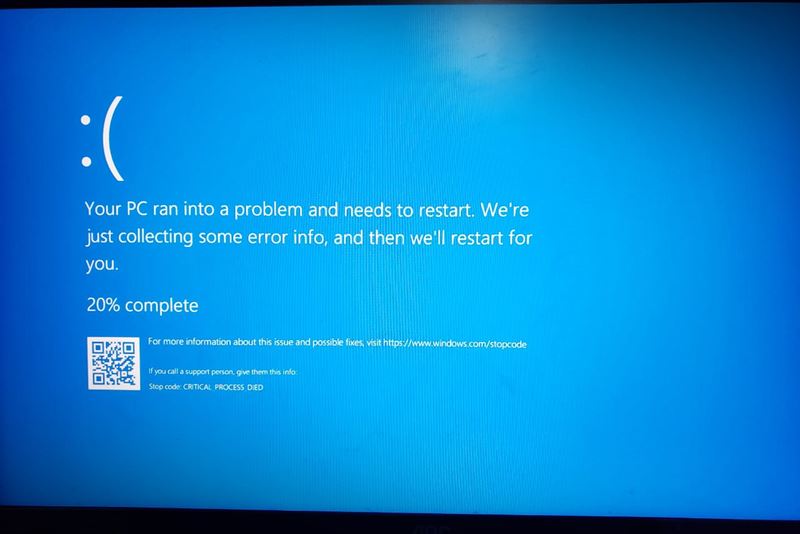
The Blue Screen error has haunted computer users – and I also have been on the receiving end. So, if it is happening to you – there is nothing to worry about.
This error is typically associated with a faulty motherboard. While it may not directly tell you what the fault with the motherboard is – rest assured, be prepared because there is certainly something wrong with it.
2. Freezes and Crashes
If you are experiencing any crashes when using the PC or any specific application, you likely have a bad motherboard. This is what a typical PC crash looks like.
Although a little hard to pinpoint, a system-wide freeze will often accompany a PC crash. A freeze is basically the PC being stuck for a while before restarting or shutting down.
3. No Boot
If your PC is not booting up when you switch it on, it can indicate a dead or dead motherboard. Don’t get ahead of yourself, though, because there can be other reasons behind the boot failure.
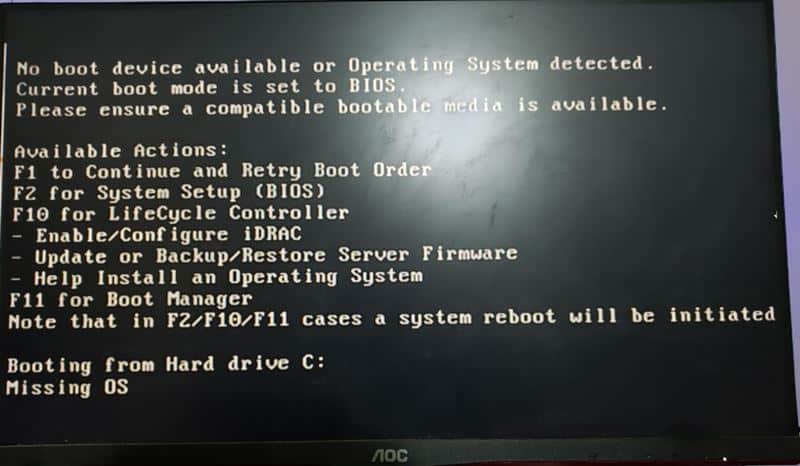
If you constantly get the annoying error, as shown in the above picture. In that case, it is usually clear that your PC has a boot failure.
Also, it can be the case that you are getting boot failure after your PC crashes. In that case, I am afraid all the indicators point towards a potentially bad or dead motherboard.
4. Slowdown or Lag in the PC
If your PC’s speed and performance are slowly deteriorating to the point where it feels sluggish to use, this is a major indicator of a bad motherboard.
Most likely, your motherboard has worn off due to excessive use or old age and is now unfit to handle all the other PC components.
5. Hardware Not Getting Recognized
Another common symptom for PCs with a bad motherboard is hardware not getting recognized.
For example, you plugged in a USB pen drive into the USB slots of your motherboard, but it doesn’t get recognized. This is a classic example of what this issue looks like.
If the PC hardware is not getting recognized, it will randomly start showing 8GB RAM, contrary to the 16GB RAM capacity of your computer.
Other times, the hard disk may fail to load up, or your PC’s storage space may not be available in the worst-case scenario.
How to Verify If You Actually Have a Bad or Dead Motherboard?
While the previously mentioned symptoms are a sign of the motherboard going bad; however, they can also be due to many other errors in the PC.
What to do now – Well, don’t worry; the following is how you can verify if the motherboard is really the faulty component in your PC.
1. Physical Damage on the Motherboard
Let’s kick off the list with the most obvious one. A motherboard is arguably the PC component with the most wear and tear – it bears the burden of all the other components, for crying out loud.
Sometimes, this accelerated wear and tear from using the motherboard can cause a malfunction. The following are the physical damage cues you should look for.
Check for Any Crack or Bend in the PCB
The number of motherboard issues due to a broken or bent PCB is staggeringly high, but I can see why this is the case. A motherboard has a lot of intricate electrical components that can easily be damaged – sometimes even the slightest scrape or scratch if not handled correctly.
The areas around the GPU, RAM, and CPU slot are especially prone to damage when you install the respective components.
I had a motherboard with a missing resistor, which would kill all the power going to the CPU. I know it can be hard and time-consuming – but sit down, bring a cup of coffee with you and get to work.
Pixel peep each corner of the motherboard to see if the PCB is not cracked or broken.
Pro-tip, keep a magnifying glass with you. It will greatly reduce the required effort and cut the time for this task in half.
Water Damage
No! Water damage is not always because of spilling water on the motherboard. It can also occur when a liquid cooler installed on the CPU fails and eventually leaks.
Luckily, checking for water damage on a modern motherboard is relatively simple because they have stickers that get discolored when making contact with any form of liquid.
Check for any discolored stickers to ensure that your motherboard is free from this issue. If none exist, you are fine, and the motherboard does not have any water damage.
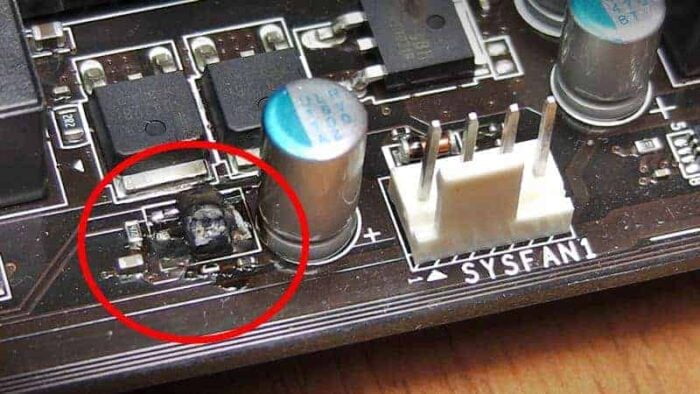
Short Circuit
A motherboard is an electronic component, and short circuits in these sorts of items are usually quite common.
You think I might be beating around the bush by repeatedly saying to buy a good motherboard – but it is for your own benefit. This issue is especially common in inferior quality motherboards with shady soldering joints.
Another plausible cause for a short circuit is loose and dangling cables. If your PC has sloppy cable management – fix it ASAP.
While not the easiest to identify, short circuits leave a burn mark around the damaged area. You could also open the PC case’s side panel, turn on the motherboard, and look out for a burning smell.
2. Check the CMOS Battery of the Motherboard
A motherboard is an electronic device, just like your mobile phone. Hence it needs a battery to keep functioning.
Therefore, every motherboard also has a small battery – known as the CMOS cell, which keeps the motherboard ticking.
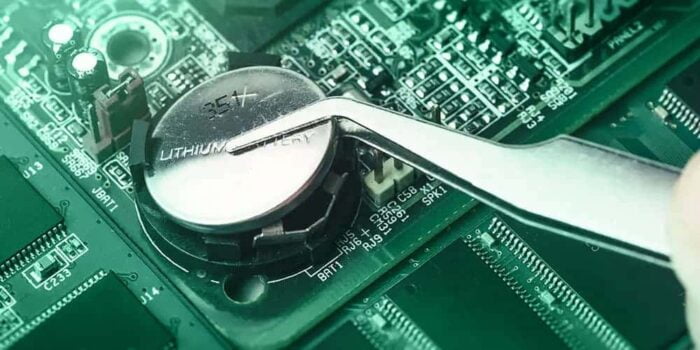
This battery diminishes over time but can also malfunction, leaving you with a dead motherboard. In addition, without a CMOS cell, a motherboard cannot access its BIOS, hence resulting in no BOOT.
A simple fix is installing a new CMOS battery. It is quite cheap to replace and available everywhere so you won’t run into any trouble.
3. Verify if the Motherboard Can Perform POST
The motherboard Power-on-Self-Test (POST) is the first process that occurs when you turn on the PC. It happens before the Windows start-up screen, as shown in the picture.
Each time you turn on the computer, the motherboard performs a POST to check for any internal errors in the computer hardware prior to its starting. Any error detected means a failed POST, resulting in the PC not turning off and being stuck in a restart loop.
POST is the first and the most crucial task of the motherboard. If the motherboard cannot perform POST, it means that it is dead or bad.
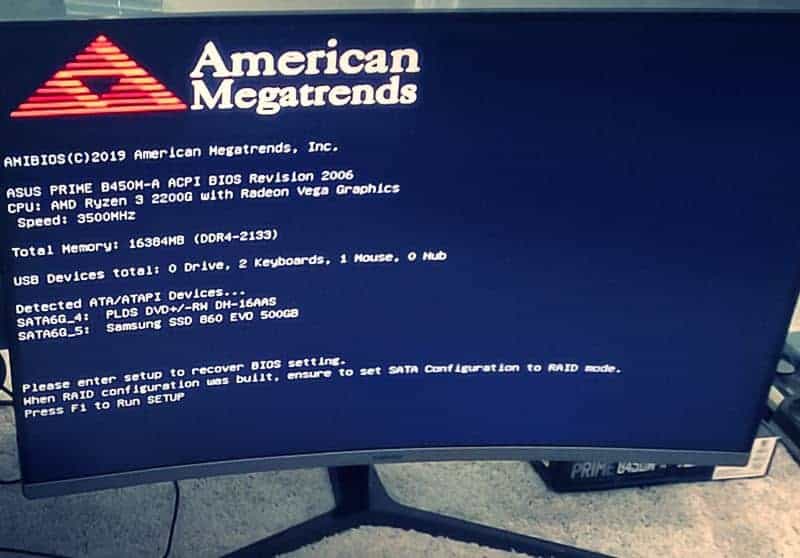
However, if you are getting the similar screen as shown in the above picture when starting your computer, it means that the motherboard is working,
Note: A motherboard can also fail POST if there is no CPU attached to the motherboard or if the CPU is faulty. It is because the video output ports of the motherboard through which the monitor receives signals are connected to the CPU. Therefore, no CPU means no display resulting in a failed POST.
4. Listen for Any Beep Code Errors
A motherboard will give a beep code error if it fails to POST. The audio pattern of the beep codes varies in regard to the error that has been identified during POST.
For instance, a constant single beep means that the memory is faulty or misaligned, while five beeps mean the CPU is faulty.
Besides these two, there are also many other patterns which are as follows.
- 1 Beep- faulty or misaligned memory
- 2 Beeps- bad motherboard
- 5 Beeps- faulty CPU
- 8 Beeps – Display Memory/Write test failure
- 9 Beeps- issue present in the BIOS or ROM
- 10 Beeps – CMOS battery failure
- 11 Beeps – Cache Memory error
I should tell you that not all motherboards come with beep code speakers. So the reason you might not be hearing beeps is that your motherboard does not have one.
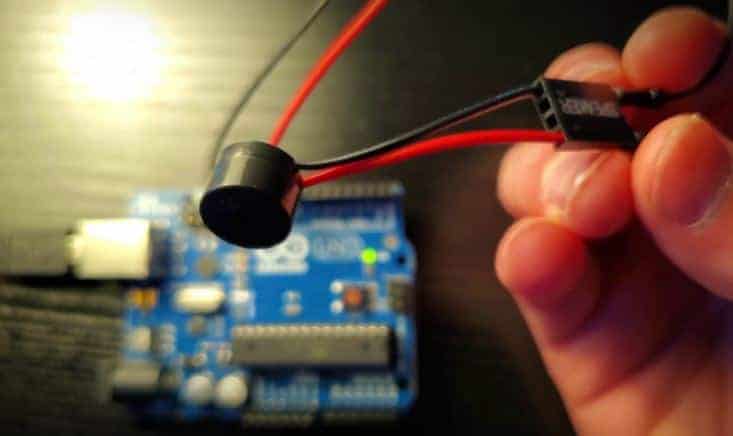
The rounded disk-shaped object you are seeing in the picture is the beep code speaker. To check if your motherboard has one, look for it attached to the front panel connector of the motherboard.
If your motherboard doesn’t have one, don’t worry, you can easily purchase the beep code speaker from any PC hardware store or online at a very cheap price.
I recommend you do so because this speaker really comes in handy for diagnosing not just the motherboard but all the different components of the PC.
The gist of why I want you to buy a beep code speaker if your PC doesn’t have one is because if your motherboard cannot POST, at least it will beep.
The beeps suggest that the motherboard is performing POST at the minimum, and you are not getting a video signal on the monitor because of some other reason, which you can identify by referencing the number of beeps you are getting.
5. Check the Diagnostics LEDs
Some modern motherboards have diagnostic LEDs to help troubleshoot any issue related to POST.
To see if your motherboard has any such functionality, refer to your motherboard’s user manual or examine the motherboard until you find a set of tiny LEDs labeled CPU, VGA, DRAM, and BOOT. If you are lost for what I am talking about, refer to my in-depth guide on what the red light on a motherboard means.
The order could be slightly different depending on the manufacturer; however, rest assured these four names will be present.
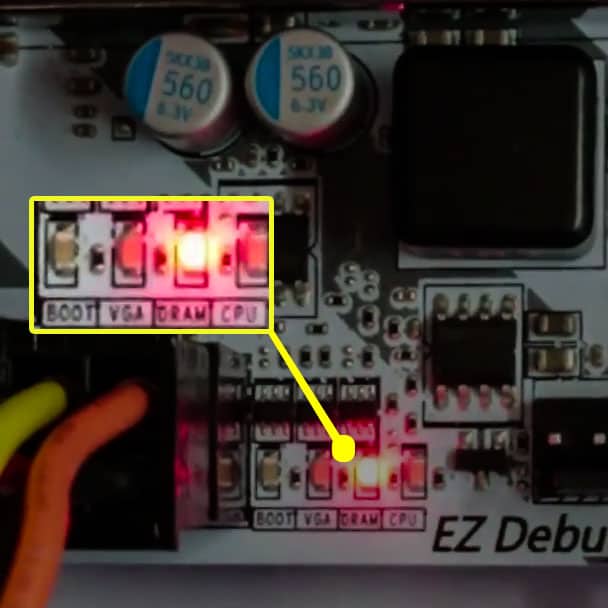
If the PC fails to POST and the BOOT LED light blinks or flashes, it is typically because of a bad motherboard.
6. Disconnect All Components From Your Motherboard Except the PSU
This is a more advanced method to verify the status of a motherboard. However, if done correctly, it guarantees accurate results.
You will need to disconnect all the other components from the PC for this method to work. Of course, you will need to open the side panel of your case and slowly remove the CPU, RAM, GPU, coolers, storage drives, and fans.
The easiest way of doing this is to remove the respective cables of all the components mentioned above that connect to the motherboard. To know where the cables are, refer to the user manual supplied with your motherboard.
If you need an even more straightforward guide, check my write-up on how to build a gaming PC.
After removing all the components – keep only the 24-pin motherboard cable plugged. Now, proceed to turn on the motherboard by jump-starting it. If you don’t know what I am talking about, refer to my guide on how to connect the power button to the motherboard.
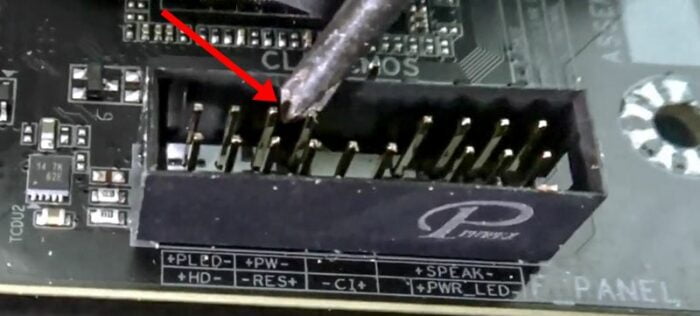
If the motherboard successfully boots up and has some lights flickering on it, congratulations, your motherboard is not dead yet.
7. Test the Motherboard With a Different Power Supply
If you have no display on the monitor and the motherboard is not turning on, you might want to check the power supply.
It can be the case that your computer’s power supply is faulty, causing it to be dead. So, in order to clear this doubt, I suggest testing the motherboard with a different power supply.
Don’t worry; replacing the power supply is quite easy, so if you have a spare one lying around or can arrange one, it will go a long way in identifying the condition of the motherboard.
If the motherboard doesn’t turn on, despite replacing the power supply. It suggests that the problem lies in the motherboard.
8. Check the Motherboard on Another PC
If you haven’t got a convincing result yet, and want to verify if your motherboard is actually bad or dead, then resort to testing the motherboard on a different PC.
You don’t necessarily need a complete PC. Only having the CPU, RAM, GPU, Storage Drive (HDD or SSD), and Power Supply will suffice.
Testing the motherboard with another PC will do two things
- It will clear all your doubts about other PC components being faulty instead of the motherboard.
- It will give you a concrete result based on which you can evaluate your next decision.
Needless to say, if the motherboard works with another PC, you have to figure out what is wrong with your PC. In that case, I suggest starting with the CPU, RAM, and GPU.
What to Do if You Have a Bad or Dead Motherboard?
If you want to know if a dead or bad motherboard can be fixed, the answer is No. Well, not technically, because a bad motherboard can be fixed, but the effort is just not worth it.
Not to mention the crazy high cost that will incur on it. The cost of the fix will be almost the same as buying a new motherboard.
Check out some of our related motherboard buying guides.
- Best Motherboard for Ryzen 5 3600
- Best Motherboard for Ryzen 5 5600X
- Best Motherboard for Ryzen 7 5800X
- Best Motherboard for Ryzen 9 5900X
- Best Motherboard for Gaming
- Best B550 Motherboard
However, If you have a relatively minor issue, like dust accumulation – that can be solved quite easily. In that case, you won’t need a new motherboard.
What Are the Causes of a Bad or Dead Motherboard?
Is your motherboard bad or dead, and do you want to know why that is the case to avoid it from happening again? The following are the causes of motherboard failure.
1. Dust Accumulation
Many folks undermine the negative impact of dust accumulation. If you take away one thing from this article, I want you to remember that dust is the kryptonite of a gaming PC.
Not only can unwanted dust harm the motherboard, but it can also hurt other PC components.
If you haven’t cleaned your computer in a while, there is no escaping excessive dust build-up in your computer.
To check for dust buildup, open the side panel of your case. Better yet, if your case has a glass side panel, you can see your PC’s dust situation through the glass window.
Any amount of dust is not suitable for the motherboard, let alone globules of dust around the motherboard and its cables. If you face such a situation, clean the dust immediately using compressed air and a microfiber cloth.
2. Overheating
Overheating in a PC is a bad indication on all fronts and not just for the motherboard. Under any circumstance, a PC should not overheat.
Heat can cause the motherboard to malfunction and not operate at its optimal capability. This can result in freezes, crashes, or random reboots.
In an ideal situation, the motherboard temperature should be around the 60°C mark. To check the motherboard temperature of your PC, download the HWmonitor software. This application will allow you to monitor the real-time temperature of your motherboard.
If the application shows motherboard temperature exceeding the safe working standards, you should nip the issue in the bud. Either take the motherboard for professional service or fix it yourself but prevent overheating because it can damage your motherboard.
3. Dropped or Smacked Around
If you are experiencing motherboard issues after dropping your motherboard or smacking it against anything, it pretty much says it all.
The PCB of the motherboard is very delicate, so it cannot survive a drop. Even if it doesn’t physically break, the motherboard won’t function properly because the tiny electrical connectors on the motherboard may become loose.
4. Power Surge
Power surges are not frequent, but they do happen every once in a while. A motherboard is very susceptible to changes in voltage; hence if you don’t have any sort of stabilizer in your home – it is highly likely that the motherboard won’t survive a power surge.
5. Old Age
A motherboard is prone to an aging factor. A motherboard has to go through extreme wear and tear; hence it shows signs of aging relatively early compared to other PC components. Therefore, it can be the simple case of your motherboard being old and in dire need of a replacement.
Related Guides
Check out some of the other related motherboard guides.
- What are Motherboard Standoffs?
- The Ultimate Guide to MSI EZ Debug LEDs Troubleshooting
- Can You Upgrade CPU Without Changing the Motherboard?
- How to Test Motherboard Without CPU? (Guide For Beginners)
- When to Upgrade Motherboard?
Final Thoughts
This wraps up our article on checking for a bad or dead motherboard. I hope that the information mentioned in the article was helpful.
If you are experiencing issues with your PC and have identified that a bad motherboard is the root cause of those issues, I would advise you to upgrade the motherboard. It would be best not to take the risk of repair on such an important PC component.
This is because even if the motherboard is repaired, the damage inflicted is a disaster waiting to happen.
Before I sign off, let me know which issues you are experiencing with your motherboard.
The Author Who Worked On This Article
Waleed Madni
A tech enthusiast with the spirit of a competitive gamer. Waleed has been around computers ever since he was young and has witnessed the progress of the machines he loves the most. Fascinated by what tomorrow has to offer, he keeps himself up to date with the latest technology and gaming trends.