So you are in the midst of an activity on your computer, and all you can hear is the hum of the GPU. You, my friend, are experiencing what is known as the GPU coil whine.
Coil whine is a phenomenon in which a high-pitched noise is created due to the vibration of coils inside PC components. The high-pitched noise is often described as a whining, buzzing, or squealing sound. Coil whine is most common in PC components like graphic cards (GPUs), power supplies, and motherboards.
The high-pitched sound of the coil whine can leave you frustrated due to its irritating characteristics. However, don’t worry. In this article, I will tell you five effective fixes for GPU coil whine.
So, without further ado, let’s begin.
What Is GPU Coil Whine?
GPU coil whine is a phenomenon that occurs when the coils on a graphics processing unit (GPU) vibrate and produce a high-pitched noise. This noise is often described as a whining, buzzing, or squealing sound.
The noise is caused by the mechanical vibration of internal parts within inductors and transformers. As power flows through these components, the changing electromagnetic forces cause components like coiled copper wire to physically move and vibrate.
These vibrations occur at very high, inaudible frequencies in the range of 3-10 kilohertz. While we can’t hear the vibrations themselves, their rapid changes and interactions can create audible noises because vibrations are conducted by the metal casing of the GPU, causing a high-pitched whining or screeching sound.
So, in summary, coil whine refers to the high-frequency whining or screeching noise produced by the physical vibrations of coils or inductors as a result of electrical current fluctuations.
It’s considered normal behavior, not a defect, and is most noticeable from components like power supplies, graphics cards, and motherboards when they’re under load.
What Causes Coil Whine in GPU?
Coil whine is caused by vibrations in electrical components such as inductors and transformers inside your graphics card.
When power passes through these components, the current can cause them to vibrate at a high frequency, which produces an audible whining or buzzing noise.
The most common causes of coil whine are:
- Electrical noise: When a GPU is put under load, or it is rendering complex graphics, the GPU produces electrical noise due to fluctuations in current. This electrical noise causes the coils to vibrate and produce a whining sound.
- Coil design and quality: The design and quality of the coils used in the GPU can also contribute to coil whine. Poorly designed or low-quality coils may be more prone to producing noise when under load.
- Power supply issues: In some cases, the power supply unit (PSU) powering the GPU may not be able to provide a clean and stable power supply, leading to electrical noise and coil whine.
- High FPS gaming: The higher the frame rate in games, the more quickly the GPU has to pulse power through its coil, increasing its vibration. For example, menus and cutscenes may run at thousands of FPS, while gameplay could be 200+ FPS, both causing whine. Limiting FPS can help reduce it.
- GPU load and frequency: Higher GPU loads and frequencies can increase the likelihood of coil whine. As the GPU works harder and draws more power, the coils may vibrate more and produce more noise.
- Component aging and wear: Over time, components within the GPU, including coils, can degrade and wear out, leading to an increased likelihood of coil whine
- Environmental factors: Factors such as temperature and humidity can also affect the likelihood of coil whine. Higher temperatures and humidity levels can potentially exacerbate the issue.
Overall, GPU coil whine can be a frustrating issue for many users, and pinpointing the exact cause can sometimes be challenging. However, being mindful of the potential causes can help users take steps to mitigate or eliminate the noise.
Which GPUs are Most Prone to Coil Whine?
Coil whine tends to occur more frequently in high-end GPUs that contain extraordinary levels of power, like the Nvidia RTX 3080 and RTX 3090. Therefore, these models are commonly associated with coil whine issues.
The fundamental reason for this is that higher-end GPUs with more cores can render frames much faster.
So when a game or benchmark is running at very high frame rates exceeding the display’s refresh rate, the GPU components have to rapidly cycle on and off to keep up. This fast switching can cause the coils to vibrate and create an audible whining noise.
Additionally, smaller form factor GPUs are more prone to coil whine. With less space for cooling and noise dampening, the high-frequency vibrations from the coils can escape more easily and be noticeable to users.
Miniature GPUs like those found in small form factor PCs and laptops tend to exhibit coil whine more frequently for this reason.
Does Coil Whine Impact Performance?
Coil whine does not actually impact a GPU’s performance or function in any way. It is simply an audible noise produced by electrical fluctuations.
Some GPU components like inductors or capacitors can vibrate at certain frequencies, which causes the whining or buzzing noise commonly described as coil whine.
However, this noise has no bearing on framerates, clock speeds, temps, or any other performance metrics.
GPUs with coil whine can operate just as well as silent cards in terms of raw computing power and capability.
The noise itself does not indicate any defects or problems with the GPU either. It is simply an unintended acoustic side effect on some cards which occurs at random. So users experiencing coil whine have no reason to worry about impacts on performance.
As long as the card is functioning normally and there are no crashes, artifacts, or other issues, you shouldn’t be concerned about the performance of the GPU.
Is GPU Coil Whine Dangerous for the PC?
GPU coil whine is not dangerous, just annoying. Despite the concerning high-pitched noise it produces, coil whine does not actually damage or negatively impact computer components.
The noise is created by electromagnetic coils rapidly vibrating as power fluctuates through them.
While this vibration can sometimes be loud and irritating, it does not cause any functional issues or hazards. A coil whine is generally considered more of an auditory nuisance than an indication of a defective product.
Rest assured, coil whine itself does not damage or reduce the lifespan of your GPU, motherboard, or other computer components.
The high-pitched squeal is unpleasant but completely harmless beyond being a distraction. You do not need to worry about GPU or system failures caused by GPU coil whine.
How to Fix GPU Coil Whine?
There are several methods you can try to fix or reduce coil whine from your GPU. The following is a list of the most effective ways of fixing GPU coil whine.
Limit FPS With VSync
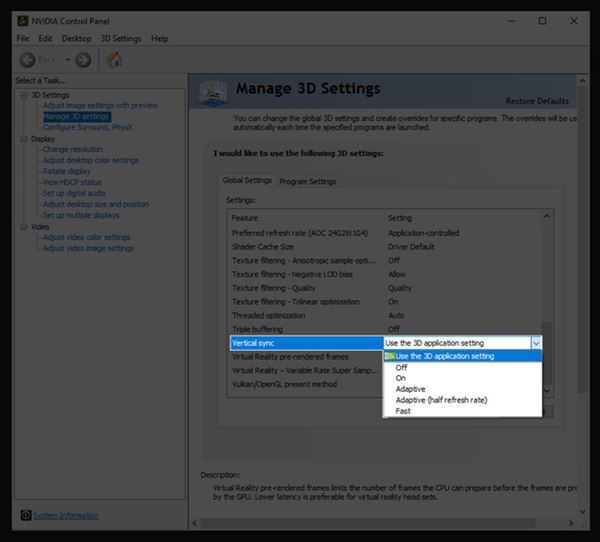
Enabling VSync in your game settings will limit the frame rate to your monitor’s refresh rate. This prevents your GPU from rendering excess frames that aren’t displayed, which reduces power draw fluctuations that contribute to coil whine.
Undervolt Your GPU
Undervolting your GPU can lower power consumption and voltage fluctuation. Although quite effective, undervolting is a complex multi-step process. Therefore, I recommend following the below guide quite closely.
Here’s how you can undervolt your GPU using MSI afterburner,
Step 1: Download the Necessary Software
To undervolt the GPU, you need software programs that will aid you in the process.
- Firstly, open MSI’s official website and download the MSI Afterburner.
- Now download HWMonitor.
- After downloading both these software, install them on your computer.
- Lastly, you will need some sort of game to test the stability of the undervolt. Many people recommend testing undervolt stability using stress testing software, but in my opinion, testing stability using a game is better. A game provides a more dynamic and diverse testing foundation than stress testing software.
Step 2: Setup the Undervolt Procedure
It is important to set up the different software and other applications that will be used throughout the undervolt process before diving into the actual process we downloaded earlier to achieve our desired undervolt results.
- Open up HWMonitor and keep it running in the background.
- Now open up MSI Afterburner and keep it running in the background.
- Fire up your favorite game and start playing it for at least 5-10 minutes. During your playthrough, press ALT + TAB and select the HWMonitor window. If you see 100% GPU utilization, proceed ahead.
- Take note of the clock speed and the voltage of your graphics card.
Step 3: Initiate the Undervolt
Now we can finally initiate the undervolt process. Here’s how it’s done.
- Before you tweak your GPU clock speed using MSI Afterburner, head over to your browser and type in the following.
- Best undervolt setting for *insert your GPU name* Reddit. For instance, if you have an RTX 4060, type “best undervolt setting for RTX 4060 Reddit”.
- Open the most recent Reddit thread and the one with the most upvotes.
- Take note of the clock speed other Redditors have achieved on the stated voltage. This will give you an idea of how low you go with the voltage.
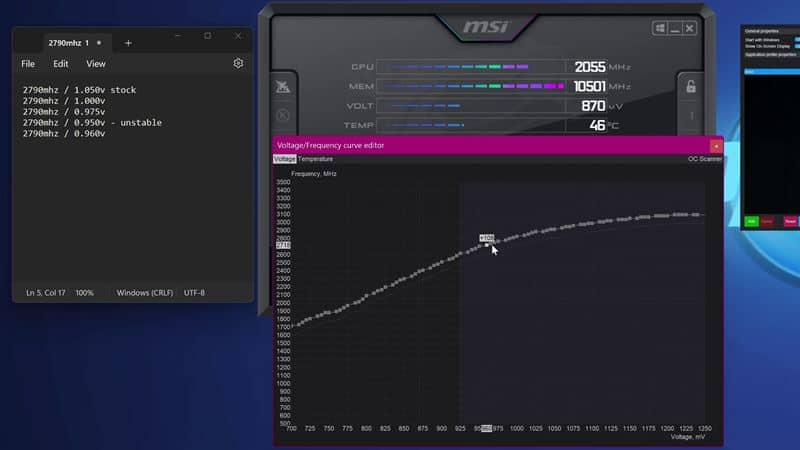
- Now open up MSI Afterburner and click on Curve Editor.
- Don’t be overwhelmed with the graphical presentation of the curve editor. Using it is quite simple. On the Y axis is the clock speed, and on the X axis is the voltage.
- By taking the clock speed and voltage you recorded in step 2 as a reference point, reduce the voltage by 50mv. For example, if you recorded 1850 MHz at 1.1 mv of voltage. Now set the voltage to 1.05mv at the clock speed of 1850.
- Return back to the game and play it for 5 minutes.
- If the computer remains stable, reduce the voltage in 50mv increments until it crashes.
- Return to the last voltage at which your computer was stable. Save the voltage, and click on the tick mark to apply the setting to your GPU.
Step 4: Testing the Stability of the
The last step of the undervolting process is to ensure stability in your computer.
- Start by firing up the most GPU-intensive game you have on your PC. Play the game for at least 30 minutes to an hour. If the system does not crash and you are satisfied with the results, you can save the profile and use it for everyday use.
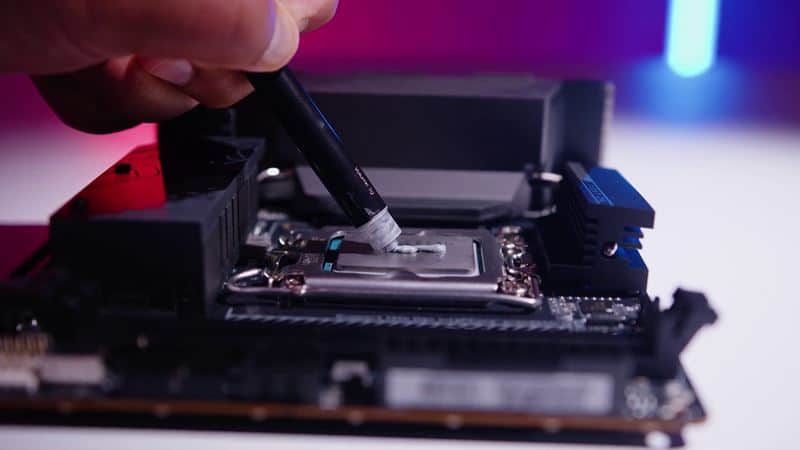
Replace Thermal Paste
Over time, the thermal paste between the GPU die and heatsink can dry out. Replacing with fresh paste improves cooling, allowing the GPU to run cooler and potentially quieter. Use non-conductive paste and follow instructions carefully.
Here’s how you can replace the thermal paste of your GPU
- Shut down your computer by clicking on the Windows logo at the bottom left of your screen. Choose the shutdown option.
- Open the side panel of the computer case by removing the thumb screws.
- Disconnect the GPU power cable.
- Unscrew the thumb screws holding the GPU to the case.
- Unlatch the GPU from the PCIe slot.
- Carefully remove the GPU from the motherboard.
- Remove all the screws on the backplate of the GPU.
- After all the screws are removed, lift the GPU heatsink upwards to expose the silicon.
- Use a soft cloth dipped in rubbing alcohol or an alcohol wipe to clean off the old thermal paste from the GPU and the heat sink.
- Apply a small amount of new thermal paste to the center of the GPU.
- Carefully reattach the heat sink to the GPU, ensuring that it is securely fastened.
- Reinstall the GPU into the motherboard and reattach any cables or connectors.
- Close the computer case and plug it back in.
Improve Case Cooling
Adding more case fans or upgrading to high static pressure fans can improve airflow and cooling. This gives your GPU more thermal headroom to operate at lower temperatures, reducing noise from coil whine. Make sure hot air adequately exhausts from the case.
With some testing and tweaking, these methods can potentially reduce or even eliminate annoying GPU coil whine noises in your system. Improved cooling and reducing GPU load are key to quieting unwanted coil whine.
Use Aftermarket Anti-coil Whine Accessories
Many companies now produce aftermarket accessories designed specifically to reduce or eliminate GPU coil whine. These accessories generally fall into two categories: passive dampers and active noise-canceling devices.
Passive Dampers
Passive dampers are pads or sheets made of vibration-dampening materials that are applied directly to the GPU. Popular materials used in passive dampers include Sorbothane, EVA foam, and butyl rubber. These materials absorb and dissipate the vibrational energy that causes coil whine.
Passive dampers are relatively inexpensive, easy to install, and don’t require any power source. However, their effectiveness can vary greatly depending on the material used and application method. Care must be taken to ensure the dampers don’t interfere with the GPU’s cooling system.
Some popular passive damper options include
- EVGA Anti-Vibration Pads
- Gelid Solutions GP-Extreme
- Phobya Noise Destructor
Active Noise Canceling
Active noise canceling employs advanced electronics to analyze coil whine frequencies and produce an inverted soundwave that actively cancels it out. This creates a quiet zone of silence around the GPU.
Active noise cancellation is more complex and expensive than passive damping. These devices require a power source and precision tuning to properly cancel coil whine without creating other audible artifacts.
However, when implemented properly, active noise cancellation can virtually eliminate coil whine. Some active noise-canceling options for GPUs include:
- be quiet! Pure Wings 2 PWM Fan with Anti-Vibration Pads
- SilverStone Technology NA First Generation Noise Reduction Kit
Overall, aftermarket accessories provide a simple way to reduce or eliminate annoying GPU coil whine. Both passive dampers and active noise cancellation have their merits, with the optimal solution depending on budget, noise levels, and ease of installation.
RMA GPU for Coil Whine
Many consumers consider returning or exchanging (RMA) their graphics cards due to annoying coil whine. However, success depends largely on the manufacturer’s policies and overall stance on coil whine.
Most brands recognize coil whine as an imperfection but not necessarily a defect. As it does not impact performance or longevity in most cases, some manufacturers may reject RMA requests for coil whine alone.
That said, brands like EVGA and ASUS tend to be more accommodating, especially if the whine is excessive. Their customer-friendly policies generally allow returns or one-time exchanges for coil whine within the initial purchase period.
Before RMA, try basic troubleshooting first. Adjust fan speeds, power plans, FPS caps, or even tighten the case and GPU screws. Updating drivers and firmware may also help, as can undervolting if the whine worsens under load. If all else fails, reach out to the manufacturer’s customer support to discuss RMA options.
When approved, they will issue a return merchandise authorization (RMA) to ship back the graphics card. However, there is no guarantee the replacement unit will be free of coil whine. The RMA process also takes time and may leave you without a working GPU for days or weeks.
RMA should be a last resort for GPU coil whine. But for those severely affected by the distracting noise, it remains an option, granted the brand’s policies allow it.
Coil Whine in Other Components
Coil whine is not only limited to graphics cards – other computer components like motherboards, power supplies, and hard drives can also exhibit audible coil whine under certain conditions.
Motherboards
Motherboards contain voltage regulator modules, chokes, and inductors to regulate power delivery to the CPU and other components. These can vibrate at audible frequencies and produce squealing or buzzing noises when under heavy load.
Factors like motherboard quality, power phases, and component types determine how prone a particular model is to coil whine. Typically, low-end motherboards are more prone to coil whine because they come with low-quality components. On the contrary, high-end motherboards come with premium-quality components, so they are less susceptible to coil whine.
Power Supplies
The transformer coils and inductors in PSUs can also emit coil whine noises when powering a system under stress, especially high-wattage PSUs paired with power-hungry components.
Cheaper PSUs with lower-quality coils seem to whine more. PSU coil whine can arise at different loudness levels depending on the load – from GPU rendering to CPU stress testing.
Hard Drives
Though not as common, hard drives can demonstrate a high-pitched squeal or squeak caused by the vibration of the platters and internal components.
This typically occurs during intense HDD activity. Some drive models and brands appear more susceptible to vibration and coil whine issues than others when pushing to their limits. SSDs don’t have moving platters, so they don’t whine.
Related Guides
Check out some of the other related GPU guides.
Check out some of our related PC guides.
- How to Check Computer Specs (CPU, GPU, Motherboard, and RAM)?
- How to Check PC Part Compatibility?
- How Much Does It Cost to Build a Gaming PC?
Final Thoughts
GPU coil whine is an unavoidable phenomenon in GPUs that arises from electrical current rapidly cycling through inductors and capacitors. While the high-pitched noise can be annoying, it does not pose any danger to your components.
The good news is that there are several ways to reduce or eliminate coil whine, which we have talked about in the article. Here’s a quick summary of the ways you can fix GPU coil whine.
- Use a frame limiter to reduce GPU load and coil vibration
- Limit FPS with VSync
- Reduce graphical settings
- Improve case airflow and cooling
- Use noise-damping materials in your case
- Replace stock thermal paste on the GPU
- Undervolt your GPU
- Limit power limit on GPU
Sometimes, completely eliminating coil whine may not be possible. Therefore, you might have to live with it. Remember, GPU coil whine is normal and harmless – just annoying!