
WiFi disconnecting from the laptop when you are in the middle of something is indeed frustrating but do not worry as you are not alone in it.
There has been an astronomical surge in user reports that state the abrupt malfunction of WiFi in their laptops.
From the gathered data most users state that the WiFi either restores in seconds or not at all.
Regardless of whatever the case may be do not fret as in this article, I will provide you with multiple proven methods you can use to purge your laptop from any such WiFi disconnections.
Our step-by-step guide will be intuitive and easy to follow. But before we do begin with counteracting the problem, I am sure most of you right now are rather confused as to how can a fully functional laptop fall victim to this issue of WiFi disconnectivity issue so let’s shed a light on that.
Why Does My Laptop Keep Disconnecting From WiFi?
In a nutshell, the surge in WiFi disconnections has been reported after the new Windows update. WiFi going bad after a Windows update is a common ordeal.
Usually, this happens because there is a conflict between the WiFi drivers of the laptop and the new windows update.
This can corrupt the drivers of the laptop, hence causing the malfunction of the WiFi. This isn’t the only reason though.
The other commonly observed problem curtails from power management issues. Windows is aggressively toting efficient framework across the board, and this can sometimes mess up the WiFi.
This is however a very simplified explanation and there is a lot more that is going on in the background.
Needless to say, you don’t have to worry about any of these issues haunting you again because coming up next are the methods which you can implement to free your laptop from WiFi disconnections once and for all.
Some Quick fixes that Might Help
Before we dig deeper into the comprehensive list of methods these prerequisites should be taken. Once there are done, we can establish that the problem is indeed a complex one.
- Turn off your WiFi Router for a minute or two and then fire it back on.
By doing this we are establishing that there is not something physically wrong with the router. Sometimes WiFi disconnections that also be caused by the overheating of a router.
- Check your router for any firmware updates
Like the laptop routers also run on software. This software can sometimes go bad therefore before we troubleshoot the laptop head over to the manufacturer’s site of your router and download the latest firmware for your router.
- Restart the laptop
This is basically us checking if Windows can automatically fix the issue by itself. It might be a surprise to you that Windows does indeed checks for any malfunction on each reboot.
- Disable any Antivirus You have Running
Often antivirus programs can also interfere with the WiFi settings of your laptop. This can cause the drivers of the WiFi to malfunction hence the disconnections follow suit. Therefore, try disabling antivirus as well.
Do Laptop Cooling Pads Work?
Step-by-Step Guide on How to Fix When Laptop Keeps Disconnecting From WiFi
With the common prerequisites out of the way let’s get to the guide, shall we?
1. Change your Network from Public to Private
This simple solution can help immensely to rectify the WiFi disconnection issue. The method to change your connection from public to private is as follows
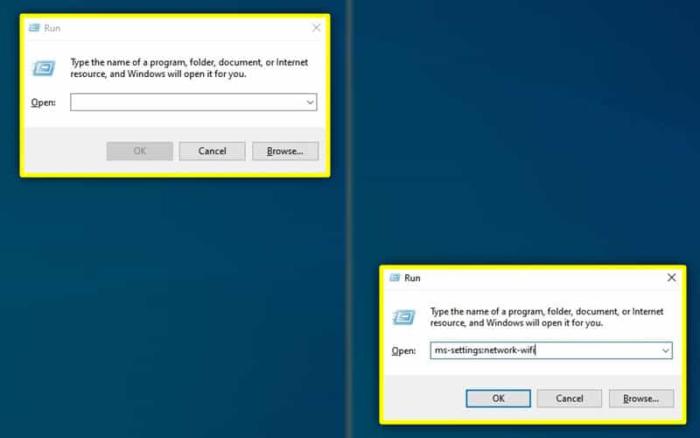
- Launch the Run window by pressing Windows + R keys. Here in the search bar type ms-settings:network-status and press enter key.
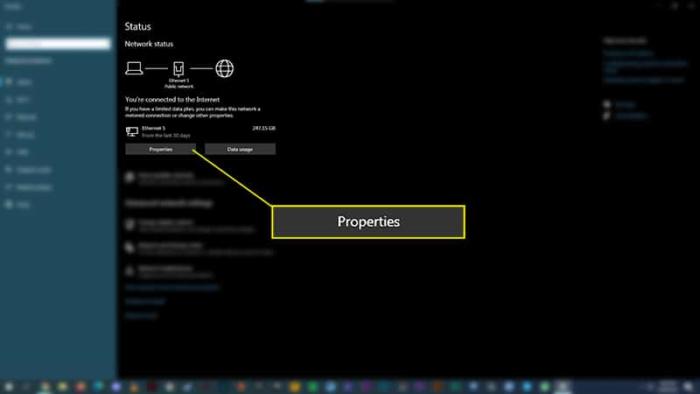
- In the new page that opens, navigate to the properties option found under the network status heading and click on it.
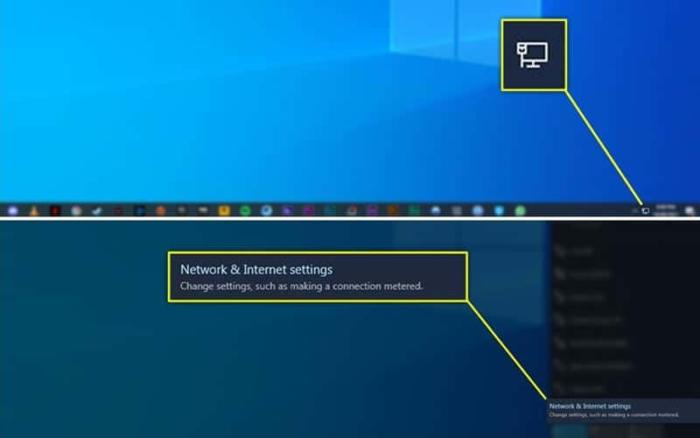
- Alternatively, you can also click on the Network icon found in the bottom right of the system tray and select the Network & Internet settings option.
- This will also open the network status page on which you can select the Properties option.
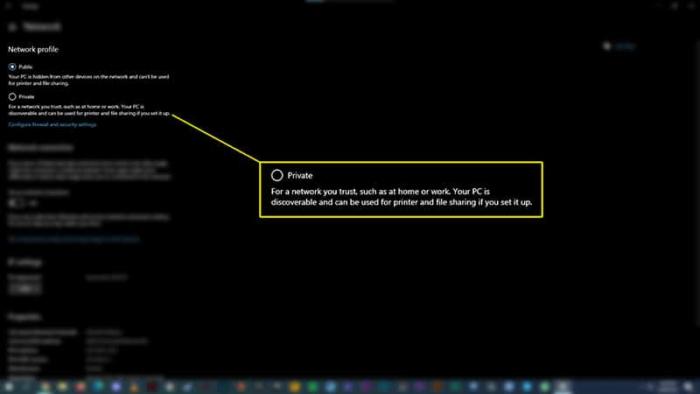
- Now simply navigate to the Network Profile heading and select the private option.
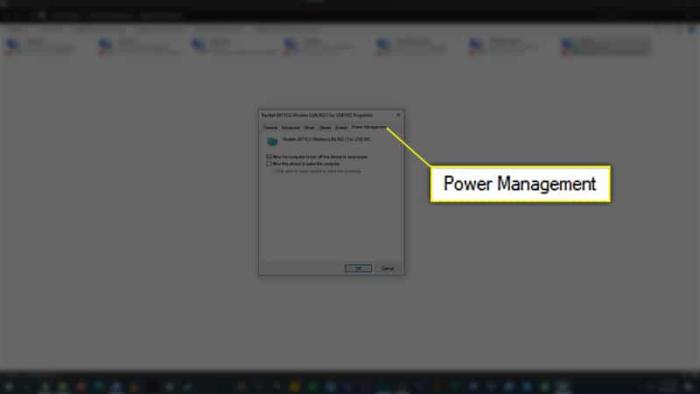
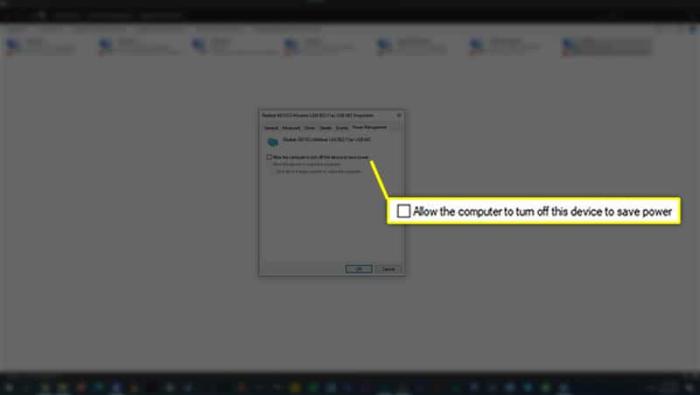
2. Disable the Powering Saving Setting of the Network Adapter
With this option enabled your Network adapter as the name suggests is trying to save power which can cause random and abrupt drops in the WiFi connectivity. To disable this option, follow the steps below
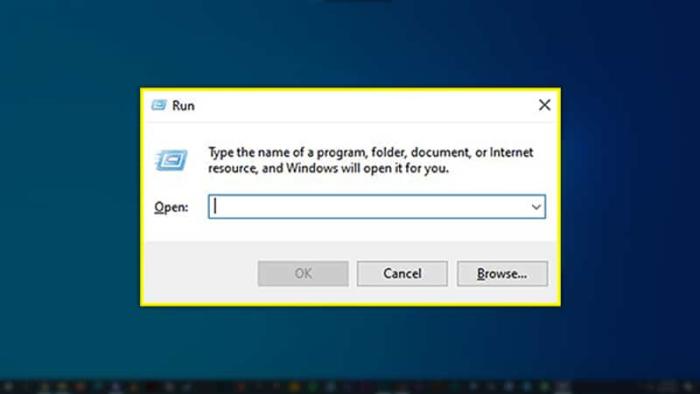
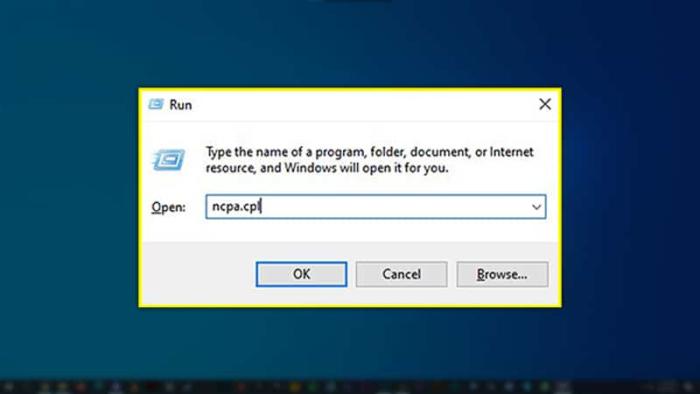
- Launch the Run window by pressing the Windows + R keys.
- In the Run window type ncpa.cpl and hit the enter key or click OK.
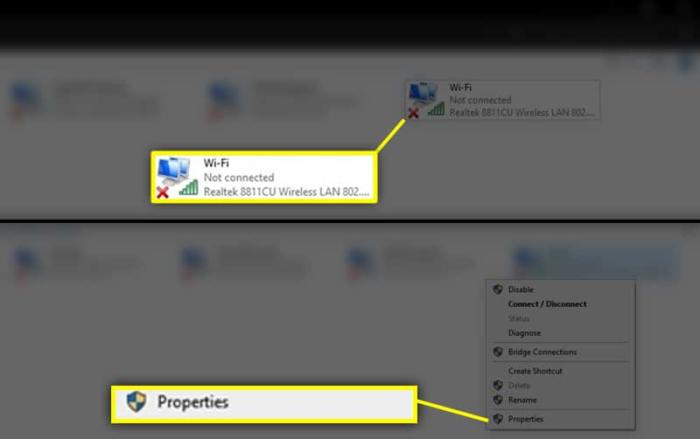
- A new setting page will open, here you have to right-click on the Wi-Fi option and select the properties option from the drop-down menu.
- Next click on the configure button
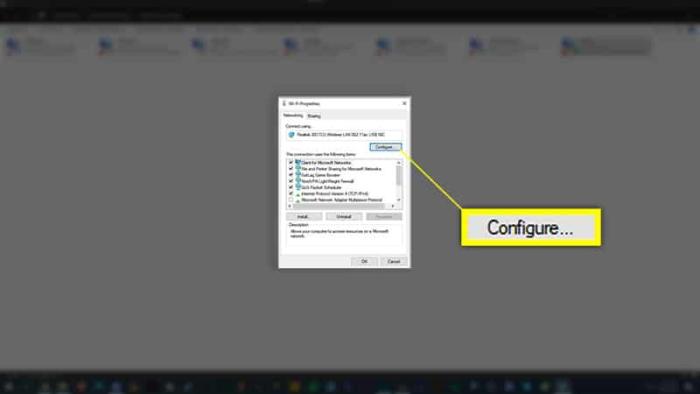
- Navigate to the Power Management tab.
- Uncheck the option that says, “allow the computer to turn off this device to save power”. Next click OK and hence you are all done.
More often than not doing this will solve your WiFi disconnectivity issue. If not, then proceed to the next step.
3. Update WiFi Network Drivers
This is an often-overlooked solution that many miss in the wake of diving into more complex solutions.
Mostly, the WiFi issue is caused by a corrupt driver therefore to update and install clean drivers these are the steps you need to follow.
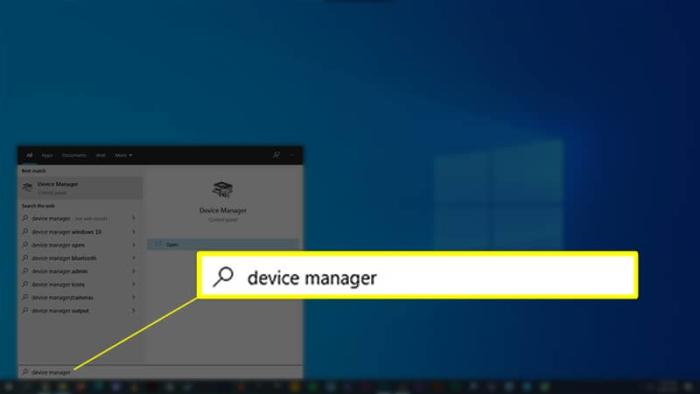
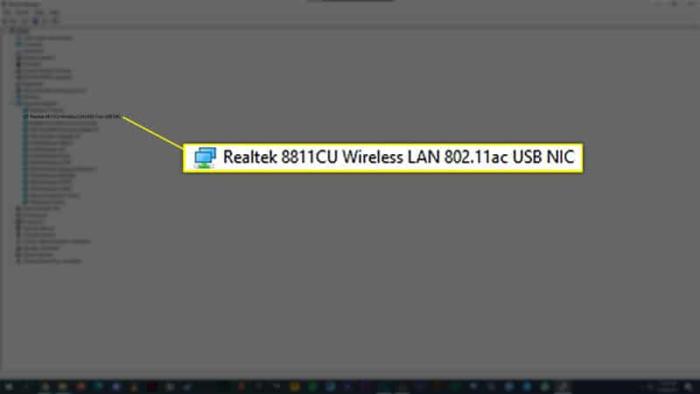
- Navigate to the windows search bar found on the bottom right of the screen beside the Windows button.

- Type device manager and press enter.
- In the new tab that opens navigate to the network adapters option and double click on it.
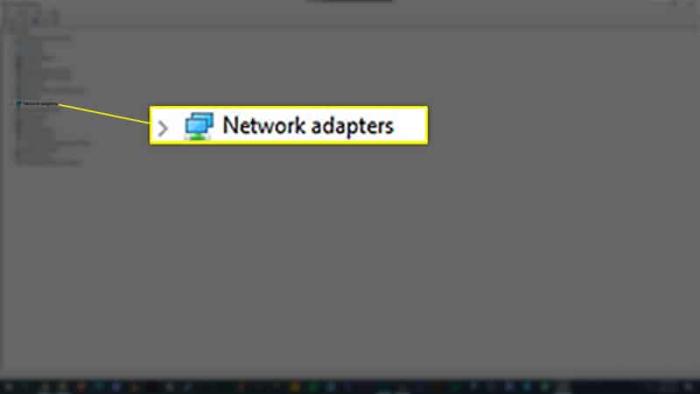
- From the drop-down menu select the wireless adapter of your laptop and again double click on it.
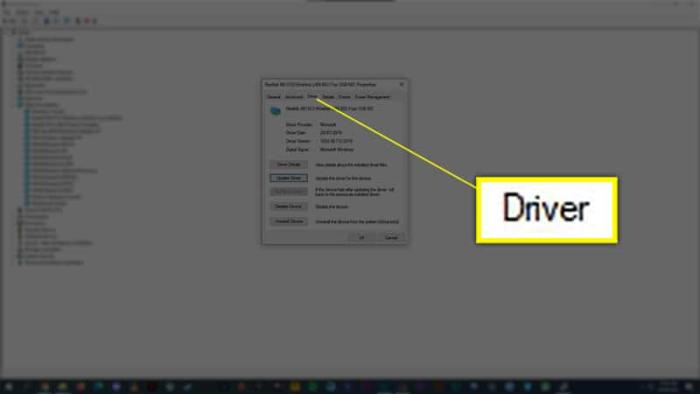
- Switch to the Driver tab.
- From the options that are presented click on update driver.
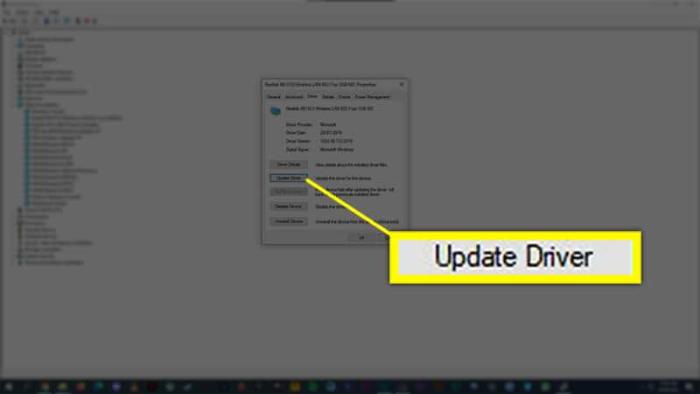
- Next, choose the option that says search automatically for drivers.

- Let the windows scan for drivers and after it is done restart your laptop.
Sometimes a situation can be presented where Windows does not find any suitable drivers for your wireless network adapter. If you are in that state proceed to the next method.
4. Alter the WiFi AutoConfig Service
WiFi AutoConfig is a service that deals with the initiation of WiFi. There is a chance that a disorder in this service is blocking the WiFi and causing it to malfunction.
- Launch the run command by pressing the Windows + R key.

- In the run command type services.msc and hit enter or click OK.
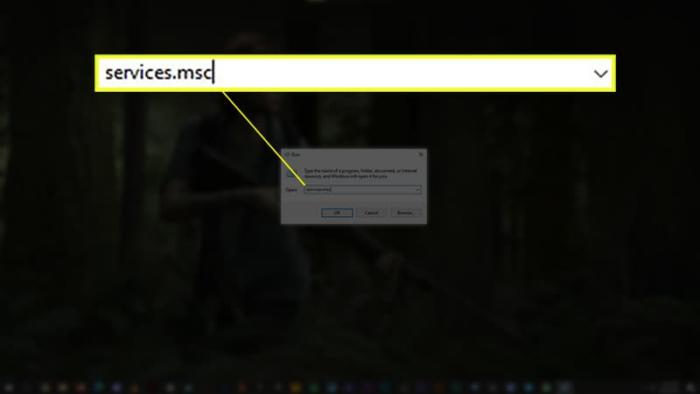
- Navigate through the different service options and locate WLAN AutoConfig.
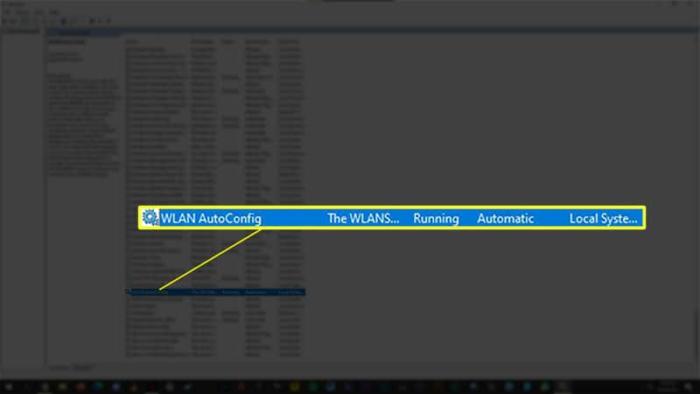
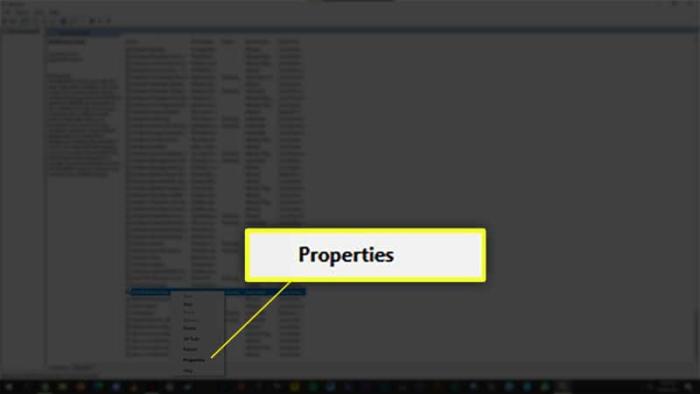
- Right-click on it and select Properties from the drop-down menu.
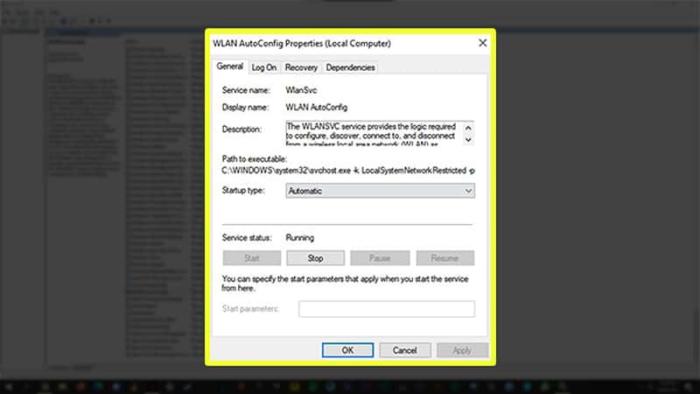
- In the new tab that opens, navigate to the Startup type option.
- Here change it to Automatic.
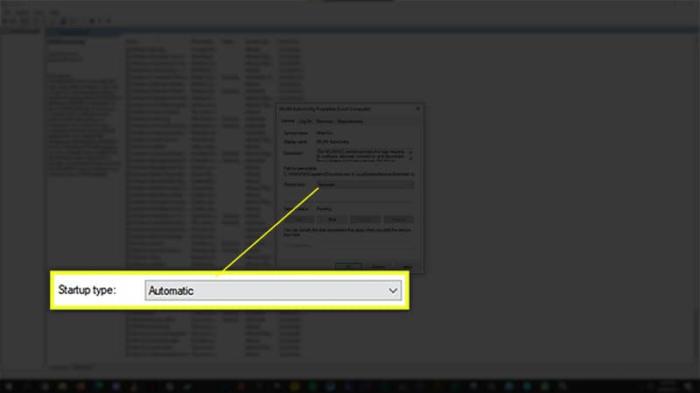
- Press the apply button which is to be followed by the OK button to exit the window.
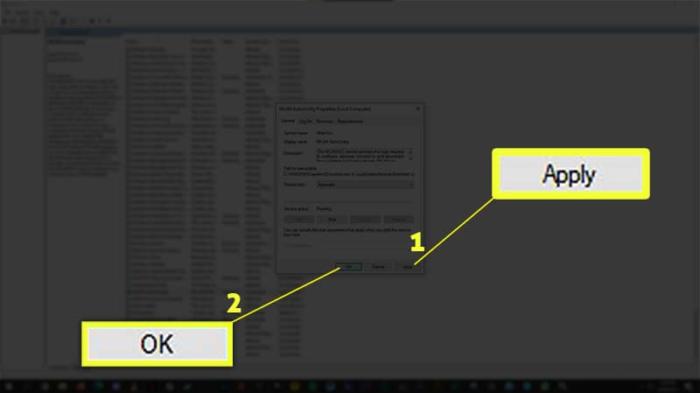
- Restart your laptop
Upon restart, Windows will try to force the WiFi from functioning. If you are still experiencing connection issues after doing this, then the last resort is the Windows Network troubleshooter.
5. Run the Windows Network Troubleshooter
Windows troubleshooter is a built-in program embedded in Windows 10 that can automatically detect any fault or malfunction in Windows. To run this troubleshooter, do the following
- Open the windows settings by pressing the Windows + I key combination.
- In the new setting tab that opens select the Network & Internet option.

- Under the advanced network settings heading click on the network troubleshooter option.
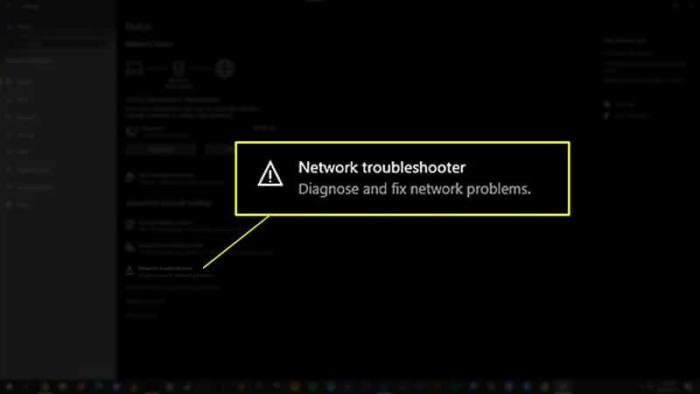
- The windows network troubleshooter will prompt you with all the network adapters on your laptop. Select the WiFi adapter here only.

- Let windows run a thorough diagnosis of your laptop’s network.
- During the process windows will ask you some input to correctly diagnose the issue. Once the complete process finishes, restart your laptop.
Although not many people like to give credit to the windows troubleshooter it can do wonders sometimes especially in terms of solving common issues. So do give it a try.
Still Experiencing Issues
If after applying all the methods, you are still experiencing WiFi connectivity issues then the problem does not lie in the software but rather the hardware.
Laptops have an internally installed WiFi card which as the laptop ages can go bad. Most likely in your case, this WiFi card is the culprit that is causing the connectivity issue.
You can check this by buying an external USB WiFi receiver. If the external receiver successfully established a WiFi connection with your router then I am afraid you need to get your laptop’s WiFi card replaced to solve the underlying issue.
Conclusion
This was a list of the proven methods that I personally follow as well when I experience hiccups with my laptop’s WiFi.
If your issue is solved by the above-listed methods or even by others let us know in the comment section. Your contribution will be of great value for people that are stuck in this hellhole loop of WiFi disconnectivity.