Ever wondered if there was an easy way of troubleshooting a PC that is not booting up?
If you are anything like me and want to go into the depths of the fault before ordering a new part for your PC, you are at the right place.
In this article, I will tell you how you can diagnose the issue in your computer using Debug LEDs. Not just any Debug LEDs, we will be troubleshooting MSI EZ Debug LEDs.
Rest assured, at the end of the article, you will know to use MSI EZ Debug LEDs to identify, diagnose, and troubleshoot the reason behind your PC not booting up.
Key Terms and Concepts You Need to Know
Before proceeding into the nitty gritty details of the article, I want you to know the following key terms. These terms will be used throughout the article. Therefore, it is expected that you know these terms and get a grip on them.
Debug LEDs
Debug LEDs in a motherboard are small, built-in LEDs that help users identify and troubleshoot hardware issues. These LEDs are typically located near the CPU socket or RAM slots and light up in a specific sequence or pattern to indicate different types of errors or problems.
The Debug LEDs light up during the Power-on Self-test (POST) to help identify and interpret the issue with the computer during the boot sequence.
In this article, I will help you troubleshoot and interpret the LED patterns to figure out what might be causing the issue in a computer and take the necessary steps to resolve it. This feature is particularly helpful for DIY PC builders and enthusiasts who don’t have access to sophisticated tools for diagnostics.
Boot
Boot refers to the process of starting up a computer. When a computer is powered on, it goes through a sequence of events that load the operating system and prepare the computer for use.
This sequence is often referred to as the “boot process” and typically involves the computer performing a series of checks, initializing hardware, and loading the operating system into memory, which is done via POST.
POST
Power On Self Test (POST) is a diagnostic process that a computer’s basic input/output system (BIOS) performs when the computer is first turned on.
The primary purpose of the Power on Self Test (POST) is to perform a series of diagnostic tests to ensure that the computer’s hardware components are functioning properly before the operating system is loaded.
This helps to identify and diagnose any hardware issues that may occur due to faulty or corrupt PC components such as the processor, memory, and storage devices. Hardware issues can also occur due to the overheating of PC components.
POST ensures that the computer is in a suitable state for startup. If any issues are detected during the POST, the computer will typically display an error message or emit a series of beeps to alert the user to the problem.
The Configuration of MSI EZ Debug LEDs
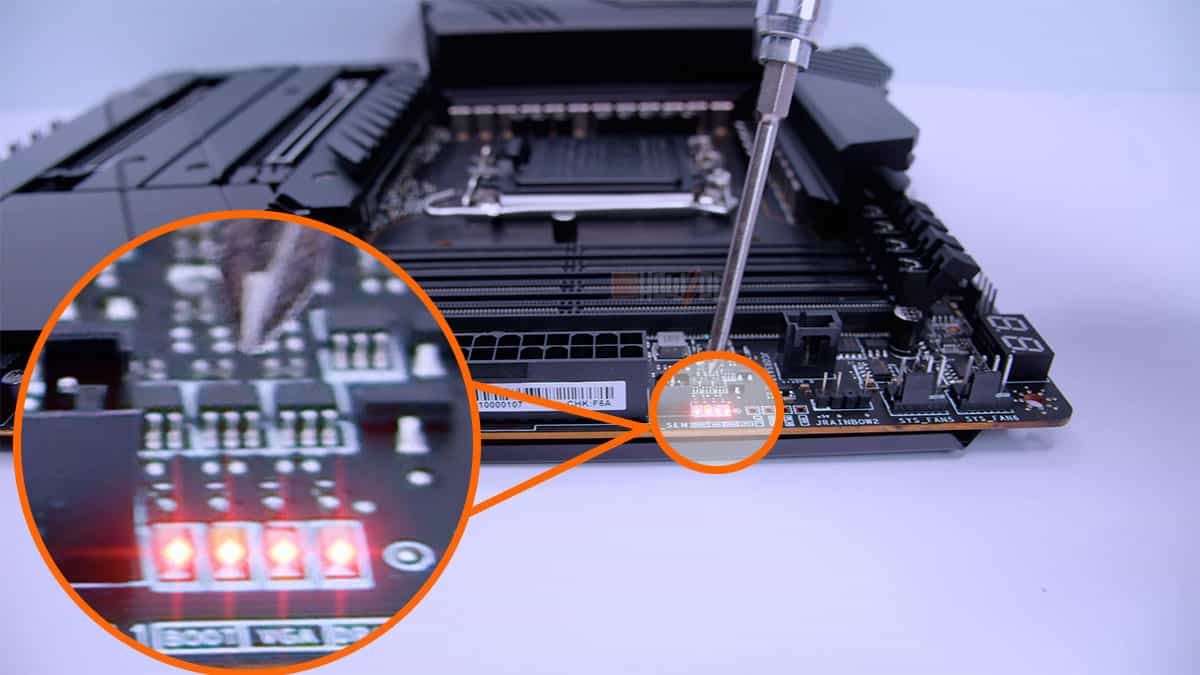
Now that you know what debug LEDs are let’s explore the configuration of MSI EZ Debug LEDs. The MSI EZ Debug LEDs consist of four individual LED lights, each of which represents Boot, DRAM, CPU, and VGA.
If any of these four lights actuate during the startup of the computer, it is an indication of a system-wide failure. The four lights are placed individually on the motherboard to make it easy for the users to identify the computer components that are hindering the startup.
The Boot, VGA, DRAM, and CPU debug lights are indicators on a computer motherboard or system that signal specific types of issues during the boot process.
What Is the Location of MSI EZ Debug LEDs
To demonstrate the location of the MSI EZ Debug LEDs, I will use the MSI Z790 Tomahawk as a reference point. Most MSI motherboards have EZ Debug LEDs located in the same spot as the MSI Z790 Tomahawk. However, please note in some particular MSI models the position of EZ Debug LEDs may vary.
The EZ Debug LEDs of the MSI Z790 Tomahawk are located at the right edge of the motherboard opposite to the 24-pin ATX power connector.
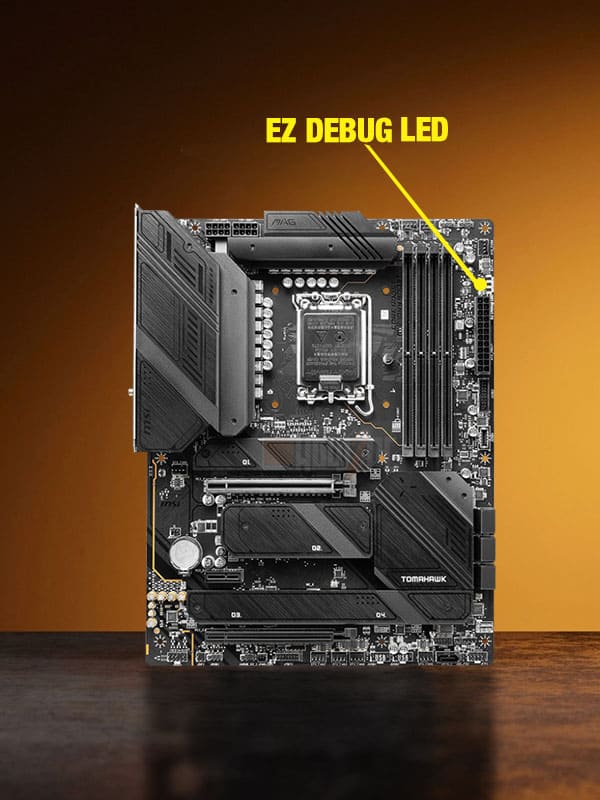
Like the MSI Z790 Tomahawk, most MSI motherboards will have the EZ Debug LEDs located in a similar position. However, if your motherboard’s EZ Debug LEDs are not opposite to the 24-pin ATX power connector, then try finding the Debug LEDs near the bottom right edge or the bottom left edge of the motherboard.
If you notice the orientation of the EZ Debug LEDs on the MSI Tomahawk, the first is CPU, the second is DRAM, the third is VGA, and the fourth is Boot. You will find the same orientation of EZ Debug LEDs on all MSI motherboards, irrespective of the motherboard’s model.
How to Read the MSI Debug LED Lights?
To read the MSI debug LED lights, simply observe them during the booting process and take note of which LED remains illuminated or flashes. Once you’ve identified the LED that’s on, refer to the corresponding component and troubleshoot accordingly.
Before you start peeping in through the side glass panel of your case, let the LED lights settle. Once there is a clear LED illumination or flashes, then proceed with the reading.
Here’s a general guide on how to read MSI debug LED lights:
- CPU LED: If this LED is illuminated, it means there’s an issue with the CPU or its related components, such as the socket or power delivery.
- DRAM LED: When this LED is on, it indicates a problem with the memory modules or the memory slots.
- VGA LED: This LED signals an issue with the graphics card or its connection.
- Boot LED: If this LED remains on, it suggests an issue with the boot device, such as the SSD or HDD.
How to Troubleshoot MSI EZ Debug LEDs?
Once you have a clear sight of which Debug light is illuminated in your computer, you will need to troubleshoot it.
In the troubleshooting process, we will dig deeper into the issue and explore why the Debug LED is on and the PC is not starting. After identifying the issue, I will provide you with potential fixes, which you can use to resolve the issues in your computer and get the Debug LED light to go away.
I have divided the troubleshooting process into four parts: CPU, DRAM, VGA, and Boot. In each part, we will explore how we can troubleshoot a specific LED light. You can skip right ahead to troubleshoot the LED light that is illuminated on your motherboard.
CPU
If your CPU Debug LED is illuminated, there is a potential issue with your CPU or its supporting components, such as a CPU cooler or the power cable.
The first step is to ensure that the EPS power cable is connected properly to the CPU. The EPS power connector is situated at the top left of the motherboard, as you can see in the picture down below.
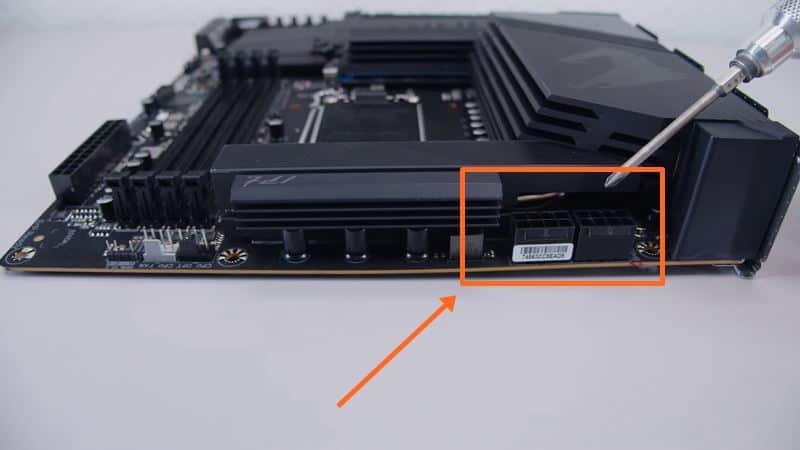
The picture shows the location of 8-pin EPS CPU power connectors. However, some motherboards also come with a 6-pin connector for the CPU power connector. So, if your motherboard has a 6-pin connector, there is nothing to worry about.
Make sure the power cable is installed correctly in the CPU power header. The power cable should be snug and not wiggle around to be properly connected.
After examining the power cable, we must ensure that our CPU is not damaged or installed in the wrong orientation.
A damaged or incorrectly installed CPU will have bent or broken pins. The pins are either located on the underside of the CPU or the motherboard socket. Intel CPUs have pins in the CPU socket, while AMD CPUs prior to the Ryzen 7000 series CPUs have pins on the underside of the processors. Please note that new AMD Ryzen 7000 series CPUs also have pins on the motherboard socket.
Here’s how you can check for any bent or broken pins and any other damage related to the CPU.
- Remove the side panel of the computer case to access the inside of the computer.
- Locate the CPU cooler, which can be either in the form of an Air cooler or an AIO liquid cooler.
- Remove the CPU cooler by removing the four thumb screws holding the CPU cooler in place. Unplug the CPU cooler cable and set the CPU cooler to a side.
- Underneath the CPU cooler, you will find the CPU socket. It is usually a square or rectangular shape with a metal lever or latch securing the CPU in place.
- Carefully lift up the metal lever or latch to release the CPU.
- Gently lift the CPU out of the socket and inspect the underside of the CPU and the socket for any bent pins, debris, or damage. If you find any issues, remove the CPU from the PC case.
- If the CPU does not have any bent pins or any sign of damage, place the CPU back into the socket. Ensure that it is oriented correctly with the socket. This can be done so by aligning the triangle notch on the CPU to the triangle notch on the socket. See the picture below for reference.
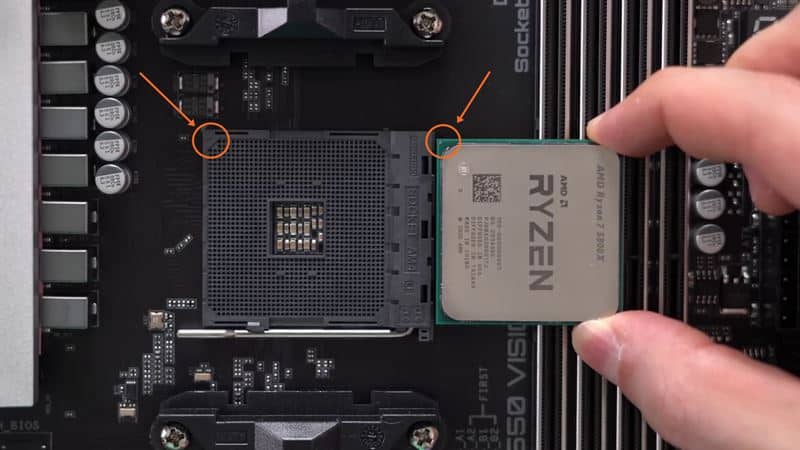
- Gently wiggle the CPU to ensure it is seated correctly in the socket. The CPU should have zero play when you wiggle it.
- Lower the metal lever or latch back into place and secure it to lock the CPU in the socket.
- Replace the side panel of the computer case and plug the computer back into the power source.
If your CPU has bent pins, they can be fixed. However, broken pins cannot be fixed, and unfortunately, your solution is to buy a new CPU.
To fix bent pins on your CPU, do the following:
- Grab the CPU you removed from the PC.
- Place the credit card on a flat surface and align the bent pins with the edge of the credit card.
- Gently push the pins against the edge of the card to straighten them.
- Be very careful and take your time to ensure that you do not break or damage the pins further.
- Once the pins are straightened, carefully reinsert the CPU into the motherboard by following steps 5, 6, and 7 of the aforementioned method.
If your CPU has no bent pins, then you need to check if the CPU cooler is working properly. The CPU cooler is the quintessential part of the whole CPU ecosystem.
The CPU cooler sits on top of the processor and removes heat generated by the processor. If this heat is not removed, it can result in the processor overheating, which can cause the PC not to start.
CPU coolers are of two types: Air Coolers and AIO Liquid Coolers.
- To check if a CPU Air cooler is working properly, ensure its fan is spinning. On the contrary, for a CPU AIO Liquid cooler, ensure that the pump and fan are both operational.
The pump of the AIO Liquid cooler is the block that sits on top of the processor and feeds the heat to the radiator. To check if the pump is working, you can place your index finger on top of it. If you feel liquid transferring inside the pump, it means that the AIO Liquid cooler is working properly.
While you are at it, also check for any leaks near the pump. Sometimes, the pump becomes damaged, which can cause all the liquid inside the AIO Liquid cooler to leak into the CPU socket, damaging it.
Lastly, you should also check for a dried-up thermal paste. Thermal paste is a substance that sits between the CPU and the CPU cooler heatsink. It is used to fill the microscopic gaps and imperfections between the CPU/GPU and the heat sink in a computer.
Thermal paste helps to improve the contact between the CPU and the CPU cooler, allowing for better heat dissipation and overall cooling performance.
By enhancing heat dissipation, thermal paste prevents the CPU from overheating. If you have worked with electronics before, you will know heat is the kryptonite of an electronic component. It can cause irreparable damage and reduce the lifespan of the components.
- If the underside of the CPU cooler heatsink has dried up thermal pastel, you need to reapply it. I recommend getting a good thermal paste from the thermal grizzly Kryonaut. The application process is quite simple. All you need to do is squeeze a pea-sized drop on the CPU. The thermal paste will automatically spread itself out when you attach the CPU cooler to the CPU.
Another potential reason why your MSI motherboard is displaying the CPU Debug LED is because of incompatibility. If you are building a new PC, you may have paired a CPU with a motherboard that does not support it.
To verify if the CPU is supported by the motherboard, check the Motherboard’s QVL (Qualified Vendor List). The QVL is a vetted list of all the CPUs that your motherboard supports.
By applying all these troubleshoots, the illuminated CPU Debug LED will likely go away. However, if it still persists, there is a major flaw with your motherboard. You need to contact MSI support or visit your local hardware repair shop.
DRAM
RAM is the essential component of the computer, and if the Power on Self Test (POST) detects any failure in the RAM, it will display the DRAM LED.
Fortunately, the issue due to RAM is quite straightforward to diagnose. In most situations, the DRAM LED comes up due to incorrect installation of RAM in the RAM slots.
Therefore, firstly, let’s address how you can remove RAM and install it correctly.
- Shut down the computer and make sure it is unplugged from the power source.
- Open the computer case to access the internal components.
- Locate the RAM slots on the motherboard. They are usually long, narrow slots near the CPU.
- Carefully release the clips on each side of the RAM slot. This will allow the existing RAM module to be easily removed.
- Gently pull the RAM module out of the slot, using equal pressure on both sides to prevent damage.
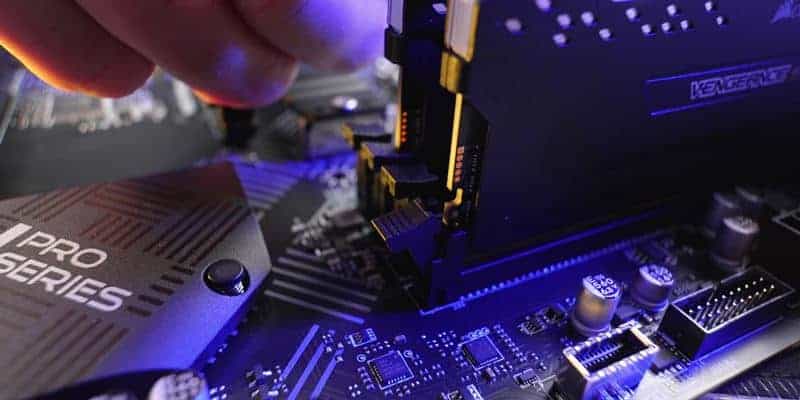
- Handle the new RAM module carefully, holding it by the edges to avoid touching the gold contacts. Align the notches on the module with the notches in the slot to ensure it is inserted in the correct orientation.
- Slide the RAM module into the slot, applying equal pressure on both sides until the clips or levers click into place, securing the module.
- Once the RAM module is securely in place, close the computer case and reattach any screws or panels that were removed.
If the RAM is properly installed and the DRAM debug LED is still lit, check to see if the RAM sticks are placed in the correct RAM slots.
The rule of thumb is to install the first memory stick in the slot nearest to the CPU first and then leave the second RAM slot and install the second memory stick in the third RAM slot.
However, the exact configuration for your MSI motherboard may be different, so it is recommended to consult your motherboard’s user manual. The user manual comes with the box content(s) of the motherboard. However, you can also download a copy of it from MSI’s website by entering your motherboard model.
If the RAM is installed correctly in the right RAM slots, then I am afraid you have dead memory stick(s). In this case, you will need to buy new RAM because old RAM cannot be repaired.
VGA
If the VGA light appears, then the issue you are facing is due to the graphics card. This can either be due to the external graphics card you might have installed on the computer or the internal graphics card of the CPU.
If you have a dedicated graphics card on your computer, I recommend beginning troubleshooting there. The monitor’s cable should be plugged into the graphics card and not the motherboard if you have a dedicated graphics card on your computer. If you plug the monitor cable into the motherboard, you will not get any display.
Make sure the graphics card is securely inserted into the PCIe slot and positioned correctly. When the graphics card is properly inserted into the PCIe slot, the latch at the end of the PCIe slot should lock into place easily without the need for any extra force.
It is also important to make sure that the graphics card is installed in the PCIe socket closest to the CPU, which is the topmost one.
Lastly, the 6-, 8-, or 12-pin power connector to the Graphics Card should be connected. The connection should not be loose, and the wire should not be bent.
If you are still getting the VGA LED after applying the above-mentioned troubleshoots, then try booting up the PC with a different GPU. Haggle a GPU from a friend, or try arranging one from your local hardware store on a test basis.
Using a different GPU will clarify if the issue is with the graphics card or the motherboard. If the computer boots up on the loaned GPU, then I am afraid your old GPU is dead. In this situation, you will need to buy a new GPU for your computer.
BOOT
The Boot EZ debug LED comes up when there is a problem with the storage drive of your computer, particularly the storage drive on which Windows is installed. Based on the type of storage drive you’re using, it’s important to ensure that they are properly connected to the motherboard. The following is what the proper installation of each type of storage drive looks like.
M.2 SSD
For M.2 SSDs, check to see that the pins are clean and properly inserted into their corresponding slot. Also, confirm that the screw has locked the SSD into place.
Note – Some motherboards (especially older ones) don’t support NVMe M.2 devices as boot drives. If you’re booting from an M.2 storage device, please consult your motherboard manual to confirm whether your board lists any limitations.
SATA SSD/HDD
For storage drives connected via a SATA port, the first step you want to take is to remove the SATA cable from the motherboard and the storage drive and then re-plug it securely.
Although it is quite rare, sometimes certain SATA ports might be disabled. Consult your motherboard’s user manual to find out if any SATA ports are disabled by default.
If your motherboard has disabled SATA ports, plug the storage drive into SATA ports that are enabled and working. You can also try replacing the SATA cable and see if that works to solve your issue.
If none of the above work, connect any spare drive you may have lying around with Windows installed and try booting the computer. You can also loan out a storage drive from your friend.
If none of the options are available, take your existing storage drive to a PC hardware repair shop and get it diagnosed by a professional.
Ultimately, you might need to buy a new drive. If that is the case, get a good storage drive to begin with that is less likely to cause issues. For SSD, I recommend Samsung EVO series and for Hard Disk Drive, I recommend the Western Digital Blue series.
No Debug LEDs Lighting Up
If you do not observe any LEDs lighting up, but still the PC does not start up after POST, it could be a problem with the power supply unit that is being used.
Before anything else, make sure the 24-pin ATX power supply connector is correctly inserted into the motherboard. If your motherboard has RGB lights, verify if they are lighting up.
Additionally, ensure that the power connectors are securely attached and that the electrical outlet is supplying power. Double-check that the Power Supply Power Switch on the back of the PSU is set to “On.”
Closing Thoughts
This article is meant to serve as a general guide for the most common issues found and associated with either building a new PC or having an EZ debug LED appear for what used to be an operational PC build.
With our MSI Debug LED troubleshooting guide, you should have been able to identify and diagnose the issue that is causing the Debug LED light to illuminate. Make sure to leave the troubleshooting that fixed your issue in the comments below, as it will be of immense help to other people who are facing a similar problem.
If you have tried everything, but the problem still persists with the PC not booting after POST, diagnosing the PC using beep codes might help.
Related Guides
Check out some of the other related motherboard guides.
- Can You Upgrade the CPU Without Changing the Motherboard?
- How to Test Motherboard Without CPU? (Guide For Beginners)
- When to Upgrade Motherboard?
- How to Tell if Motherboard Is Dead or Bad?
- What Does the Red Light on a Motherboard Mean?
- How to Test a Motherboard?
- What Is AAFP on Motherboard, and Why Is It Important?
Check out some of our related motherboard buying guides.
The Author Who Worked On This Article
Waleed Madni
A tech enthusiast with the spirit of a competitive gamer. Waleed has been around computers ever since he was young and has witnessed the progress of the machines he loves the most. Fascinated by what tomorrow has to offer, he keeps himself up to date with the latest technology and gaming trends.