The flash drive is a convenient storage medium for daily file storage and backup because it is lightweight and is inexpensive, portable, and can be connected to nearly any computer. A recent survey conducted by Vantage Market Research shows that the demand for USB flash drives is likely to rise globally by about 7% in the year 2022.
The majority of commonly used flash drives are compact and have storage capacities ranging from 8 GB to 64 GB. Smaller USB sticks with less storage space are also available; examples are 64MB, 128MB, 256MB, 512MB, 1GB, 2GB, and 4GB sticks. Despite the fact we can carry them along anywhere we want, recovering your business documents, pictures, videos, and other files from the flash drive on your own is not simple.
This post will go over the specific solutions to accomplish USB data recovery, as well as how to recover data from USB flash drives effectively and the detailed steps to perform USB data recovery. Furthermore, when you face some minor issues with USB flash drives, you can use the solutions in this article to tackle them.
3 Tested Ways to Perform Flash Drive Recovery
1. Use the Flash Drive Data Recovery Software
For users of all computer skill levels, a data recovery program is a simple approach to recovering lost files from flash devices/pen drives. You can make a comprehensive comparison in the following perspective and choose the best software for your needs.
- To assist you in discovering the correct files that need to be recovered faster, a good USB flash drive recovery program allows you to preview corrupted, lost, or deleted data. Numerous data loss circumstances, including user error, device formatting, partitioning error, malware attacks, etc., can be handled by it.
- Even better would be if it could restore files and documents from the empty recycle bin.
- A capable USB flash drive data recovery tool can deep scan your storage device and recover all types of documents, including images, emails, Microsoft Word documents, movies, audio, and PDFs.
- The prompt customer assistance or an integrated help manual would be another strong point.
After doing a side-by-side comparison, we decided to use iBoysoft Data Recovery for Windows in our test and show you the steps to recover the data from the USB flash drive. This software can recover deleted files from formatted or unexpectedly unreadable/inaccessible RAW USB flash devices. Read the steps listed below.
Step 1. Attach your flash drive or pen drive to the Windows computer’s USB port.
Step 2. Download the free iBoysoft data recovery program from the company’s website, set up the program using the Setup Wizard, and then run it.
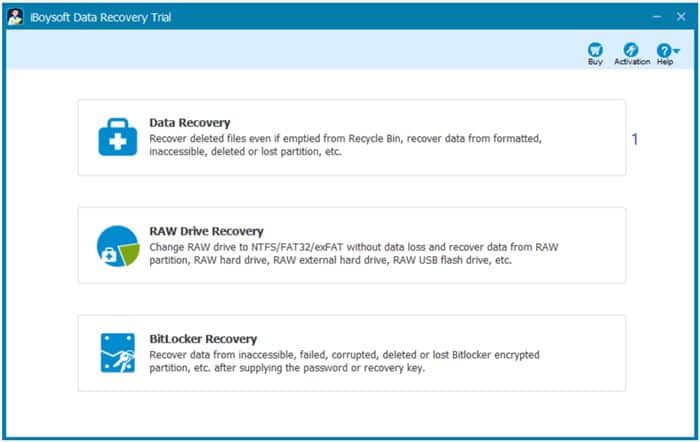
Step 3. To begin scanning this device, select the first “Data Recovery” mode, pick your flash drive from the disk list, and then click “Next.”
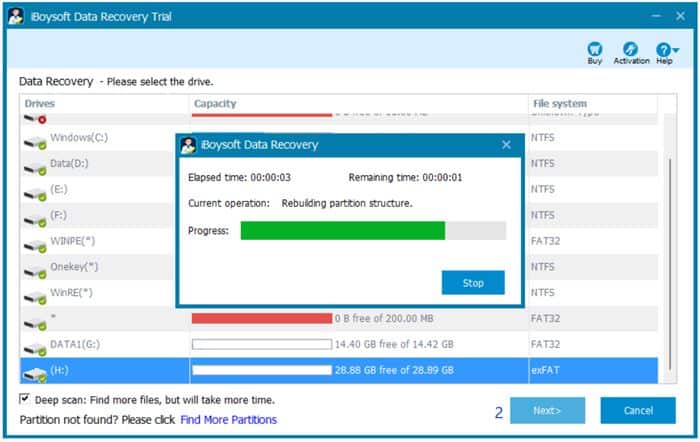
Step 4. The software will display the path to each file it found after the data scanning is finished.
Step 5. Double-click each file to preview it and find out what it is. If that is the file you are looking for, select a new location to save the recovered file by clicking the “Recover” button.
2. Using the Command Prompt to Recover Data From USB Flash Drives
Advanced computer users can recover files from flash devices using the Windows command prompt, sometimes known as CMD. As a reference, the detailed instructions are provided below:
- On a Windows-based computer, press Windows + R, then, when the search bar appears, type “CMD”.
- Press the Enter key after typing chkdsk “drive letter of your flash drive”: /f (The example image below shows the case that the portable USB drive is disk E).
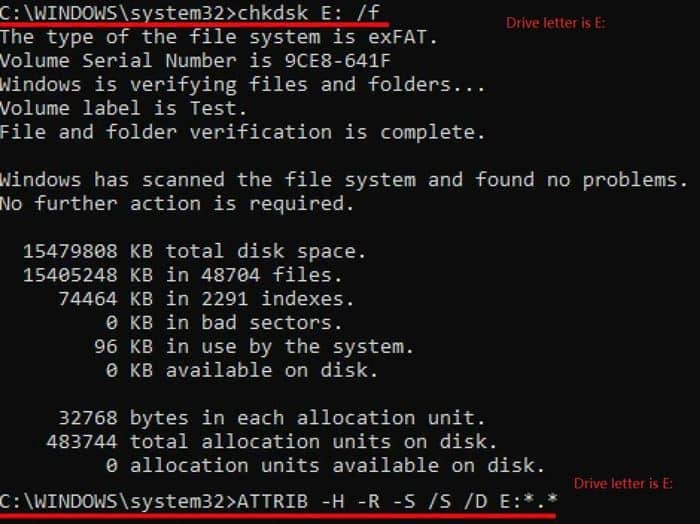
- Lastly, execute the following command in the message window to begin retrieving deleted/lost files: Enter ATTRIB -H -R -S /S /D “the drive letter of your data storage device”:*.*. (Refer to the image above, when your flash drive is disk E, you should enter ATTRIB -H -R -S /S /D E:*.* in the message window.)
- Once the data recovery is successful, your PC will create a new folder on the flash drive to store the newly recovered documents. If the recovered files are in CHK format, you must rename each one with the appropriate file suffix to open, view, and utilize it.
3. Restore Your Flash Drive’s Files to the Previous Version
- The Windows operating system’s Previous Versions function is a helpful tool that enables users to recover crucial data that has been inadvertently lost. You have the option to restore your crucial files to the previous version if you enabled the capability of Previous Versions before the data on the USB flash drive became lost.
- Attach the USB drive to a computer (Most desktop computers have USB connections on either the back or the front of the computer casing, while laptops frequently have USB connectors on the left and/or right side).
- Open This PC, then find the USB flash drive attached to your computer, right-click on it, and then choose Properties.
- Select the Previous Versions tab, check out to see if the file you want to recover is in the most recent previous version, and click the Restore button if you find it.
Common USB Flash Drives Issues and Quick Fixes
1. USB Flash Drive Not Be Recognized
Our system occasionally fails to recognize the USB flash disk, even after we attempt to disconnect and re-plug it. Here are a few things you can attempt to solve the issue:
- Your computer should be turned off and then restarted. Reconnect the USB flash drive now and check to see if the computer can detect and recognize it.
- If your USB port is experiencing a problem, try to insert the flash drive on a new USB port or other people’s computer.
- Format the USB flash drive and use it like a new one.
2. USB Drive Not Showing Files and Folders
If the files on your USB drive are hidden, you cannot see them with the naked eye. Connect your USB drive to your computer, when it doesn’t display files and folders, you can follow the steps to unhide them:
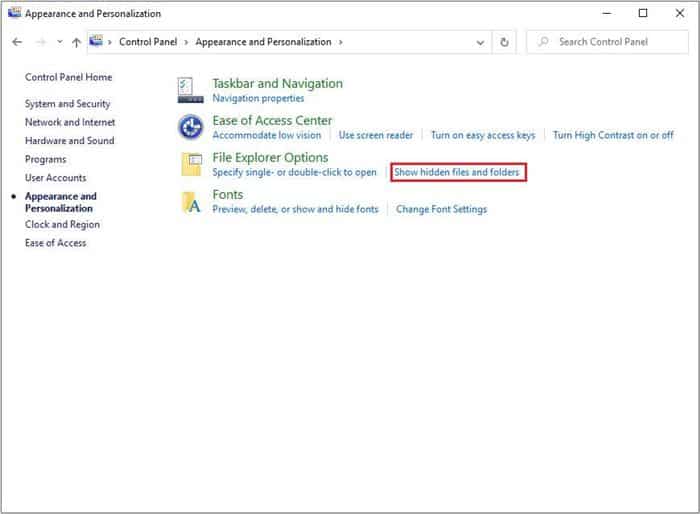
Step 1: Right-click Start on your Windows computer -choose Control Panel – click Appearance and Personalization – Click the Show hidden files and folders option under File Explorer Options. (You can check the example image below).
Step 2. Check Show hidden files, folders, and drives, and uncheck Hide protected operating system files (Recommended), at last click “OK”.
3. The File System of Your USB Drive Is Damaged or Wrong
Your flash drive may become RAW for a number of reasons, including file system corruption, numerous faulty sectors, malware attacks, etc. You cannot access or open the files on a USB drive if the file system is corrupted or when you find that your USB disk has gone RAW. On your computer, you will typically get one of these error messages when you try to open the flash drive: “You need to format the disk before you can use it”, “The disk is not formatted” or “The volume does not contain a recognized file system.”
Important Note: Do not format your USB drive immediately if there are some important documents on it. Once you convert RAW to FAT32 or NTFS file system in this stage, the lost data may get overwritten and impossible to be recovered.
A better way out is to use data recovery software, such as iBoysoft Data Recovery for Windows, to recover crucial files from the malfunctioning flash drive. Once you are certain that you have saved the files to a safe location, you can convert the RAW drive to the desired file system.